Home
Browse
Ask Us
Chat
Harmful Language Statement
Log in
Advanced Search
Year
2017
2018
2019
2020
2021
2022
2023
2024
TO
2017
2018
2019
2020
2021
2022
2023
2024
Type
Image
67
Text
1
Format
image/jpeg
62
application/pdf
5
Collection
College of Architecture + Planning
3
NOVEL - Daniel Gold Collection
61
Peoples of Utah Revisited
1
Undergrad Research Abstracts Journal
2
Filters:
Type:
"Image"
1
-
25
of
67
<
1
2
3
>
Gallery view
Number of results to display per page
10
25
50
100
200
Sort by Relevance
Sort by Title A-Z
Sort by Title Z-A
Sort by Date Ascending
Sort by Date Descending
Sort by Last Modified Ascending
Sort by Last Modified Descending
Title
Date
Type
Setname
1
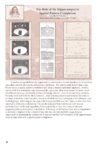
The Role of the Hippocampus in Spatial Pattern Completion
Image
uu_urop
2
Subregional Analysis of the Dorsal Hippocampus in Spatial Pattern Completion in the Rat
Image
uu_urop
3
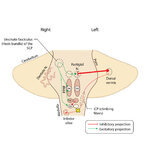
Central Anatomy of the Fourth Nerve
2017
Image
ehsl_novel_gold
4
Central Anatomy of the Third Nerve
2017
Image
ehsl_novel_gold
5
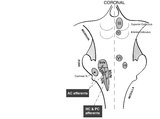
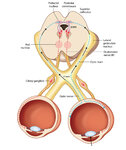
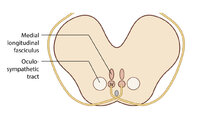
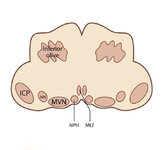
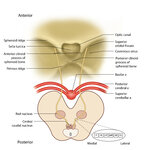
Coronal Section of the Brainstem Showing Ocular Motor Nuclei and Anatomy of the Vestibular Nucleus (with SCC Inputs)
2017
Image
ehsl_novel_gold
6
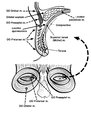
Eyelid Anatomy
2017
Image
ehsl_novel_gold
7
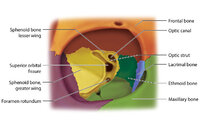
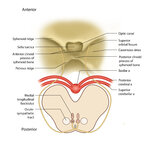
Figure 17: Bony Structures Relevant to the Orbit
2022
Image
ehsl_novel_gold
8
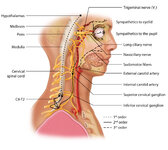
Figure 1: Oculosympathetic Pathway for Pupillary Dilation
2022
Image
ehsl_novel_gold
9
Figure 24: Typical Visual Field Defects Associated with Discrete Lesions Along the Visual Pathways
2022
Image
ehsl_novel_gold
10
Figure 27: Vascular Supply of the Optic Nerve Head, Choroid and Retina
2022
Image
ehsl_novel_gold
11
Figure 2: Parasympathetic Pathway for Pupillary Constriction
2022
Image
ehsl_novel_gold
12
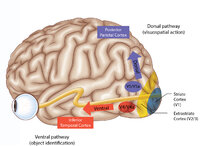
Figure 43: How the Brain Makes Sense of What It Sees - The Dorsal and Ventral Visual Pathways, and a 3 Tiered Approach to Vision
2022
Image
ehsl_novel_gold
13
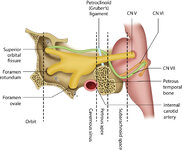
Figure 46: The Course of the 6th (VI) Nerve
2022
Image
ehsl_novel_gold
14
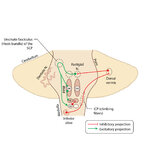
Figure 50: Anatomy and Physiology of the Saccadic Pathways
2022
Image
ehsl_novel_gold
15
Figure 51: Lateral Medullary Lesion Causing Saccadic Dysmetria
2022
Image
ehsl_novel_gold
16
Figure 51: Lateral Medullary Lesion Causing Saccadic Dysmetria (Supplement)
Image
ehsl_novel_gold
17
Figure 51: Lateral Medullary Lesion Causing Saccadic Dysmetria (Supplement)
Image
ehsl_novel_gold
18
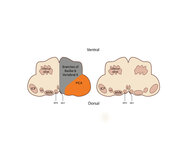
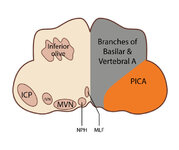
Figure 53: Vascular Distribution and Anatomy Relevant to the Lateral Medullary (Wallenberg) Syndrome
2022
Image
ehsl_novel_gold
19
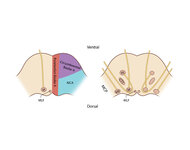
Figure 53: Vascular Distribution and Anatomy Relevant to the Lateral Medullary (Wallenberg) Syndrome (Supplement)
Image
ehsl_novel_gold
20
Figure 53: Vascular Distribution and Anatomy Relevant to the Lateral Medullary (Wallenberg) Syndrome (Supplement)
Image
ehsl_novel_gold
21
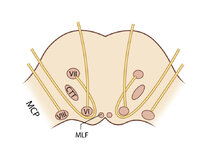
Figure 61: Vascular Distribution and Anatomy (Including 6th, 7th, 8th Nerves, MLF) of the Pons
2022
Image
ehsl_novel_gold
22
Figure 61: Vascular Distribution and Anatomy (Including 6th, 7th, 8th Nerves, MLF) of the Pons (Supplement)
Image
ehsl_novel_gold
23
Figure 61: Vascular Distribution and Anatomy (Including 6th, 7th, 8th Nerves, MLF) of the Pons (Supplement)
Image
ehsl_novel_gold
24
Figure 64: The Course of the 3rd (III) Nerve
2022
Image
ehsl_novel_gold
25
Figure 64: The Course of the 3rd (III) Nerve (Supplement)
Image
ehsl_novel_gold
1
-
25
of
67
<
1
2
3
>