|
|
Title | Date | Type |
| 1 |
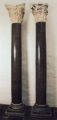 |
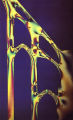
Aachen Columns | | Image |
| 2 |
 |
Abbey Church of Saint Gilles, west façade | | Image |
| 3 |
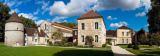 |
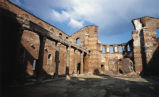
Abbey of Fontenay | | Image |
| 4 |
 |
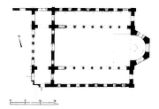
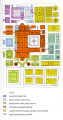
Abbey of Fontenay, ground plan | | Image |
| 5 |
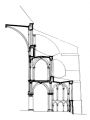 |
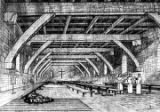
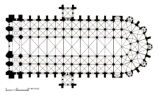
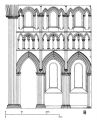
Abbey of Saint Remi, cross section of choir | | Image |
| 6 |
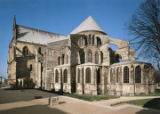 |
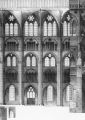
Abbey of Saint Remi, exterior view of the chancel, from the southeast | | Image |
| 7 |
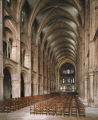 |
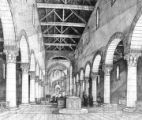
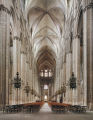
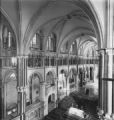
Abbey of Saint Remi, nave facing east | | Image |
| 8 |
 |
Al-Azhar Mosque | | Image |
| 9 |
 |
Al-Azhar Mosque | | Image |
| 10 |
 |
Al-Azhar Mosque | | Image |
| 11 |
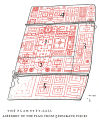
 |
Album of St. Peter's Church, atrium and façade | | Image |
| 12 |
 |
Album of St. Peter's Church, atruim and façade | | Image |
| 13 |
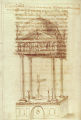 |
Album of St. Peter's Church, ciborium | | Image |
| 14 |
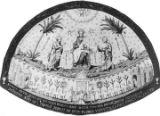 |
Album of St. Peter's, engraving of apse mosaic | | Image |
| 15 |
 |
Album of St. Peter's, view of the nave from the east door | | Image |
| 16 |
 |
Album of St. Peter's, view of the south side of the nave | | Image |
| 17 |
 |
Album of St. Peter's, view of the south side of the nave | | Image |
| 18 |
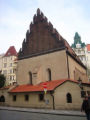 |
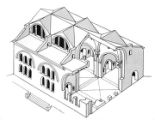
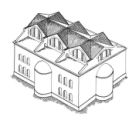
Altneuschul, exterior view | | Image |
| 19 |
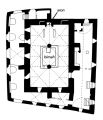 |
Altneuschul, groundplan | | Image |
| 20 |
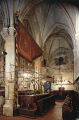 |
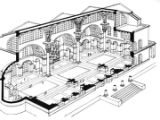
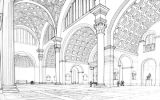
Altneuschul, interior view | | Image |
| 21 |
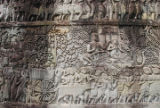 |
Angkor Thom, Bayon, relief: Battle Scene | | Image |
| 22 |
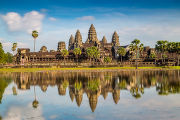 |
Angkor Wat | | Image |
| 23 |
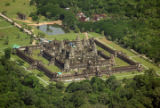 |
Angkor Wat, aerial view | | Image |
| 24 |
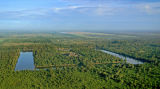 |
Angkor Wat, aerial view of site and surrounding countryside | | Image |
| 25 |
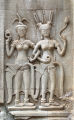 |
Angkor Wat: Apsaras Relief | | Image |
| 26 |
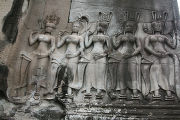 |
Angkor Wat: Apsaras Relief | | Image |
| 27 |
 |
Arena Chapel, diagram of painting program | | Image |
| 28 |
 |
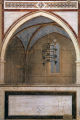
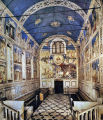
Arena Chapel, interior central space, view from the entrance | | Image |
| 29 |
 |
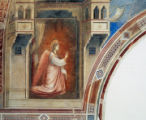
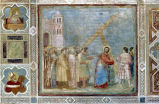
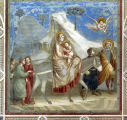
Arena Chapel, interior east end, triumphal arch, middle register, left side | | Image |
| 30 |
 |
Arena Chapel, interior east end, triumphal arch, middle register, right side | | Image |
| 31 |
 |
Arena Chapel, interior east end, triumphal arch, top register, left and right sides | | Image |
| 32 |
 |
Arena Chapel, interior east end, triumphal arch, top register, left side | | Image |
| 33 |
 |
Arena Chapel, interior east end, triumphal arch, top register,right side | | Image |
| 34 |
 |
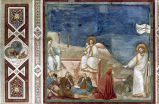
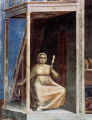
Arena Chapel, interior fresco detail | | Image |
| 35 |
 |
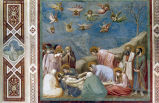
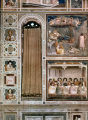
Arena Chapel, interior north and south walls, ground level register | | Image |
| 36 |
 |
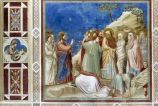
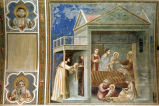
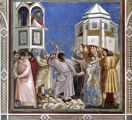
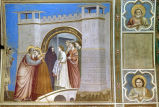
Arena Chapel, interior north wall, bottom register | | Image |
| 37 |
 |
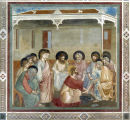
Arena Chapel, interior north wall, bottom register | | Image |
| 38 |
 |
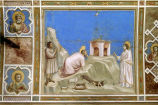
Arena Chapel, interior north wall, bottom register | | Image |
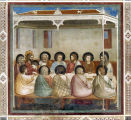
| 39 |
 |
Arena Chapel, interior north wall, bottom register | | Image |
| 40 |
 |
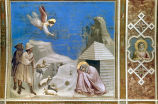
Arena Chapel, interior north wall, bottom register | | Image |
| 41 |
 |
Arena Chapel, interior north wall, bottom register | | Image |
| 42 |
 |
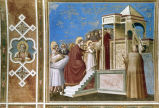
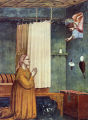
Arena Chapel, interior north wall, middle register | | Image |
| 43 |
 |
Arena Chapel, interior north wall, middle register | | Image |
| 44 |
 |
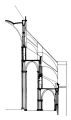
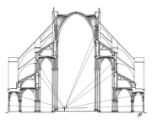
Arena Chapel, interior north wall, middle register | | Image |
| 45 |
 |
Arena Chapel, interior north wall, middle register | | Image |
| 46 |
 |
Arena Chapel, interior north wall, middle register | | Image |
| 47 |
 |
Arena Chapel, interior north wall, middle register | | Image |
| 48 |
 |
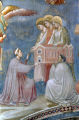
Arena Chapel, interior north wall, middle register (detail) | | Image |
| 49 |
 |
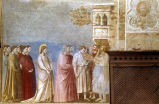
Arena Chapel, interior north wall, top register | | Image |
| 50 |
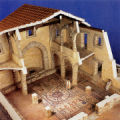
 |
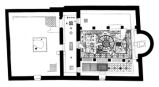
Arena Chapel, interior north wall, top register | | Image |
| 51 |
 |
Arena Chapel, interior north wall, top register | | Image |
| 52 |
 |
Arena Chapel, interior north wall, top register | | Image |
| 53 |
 |
Arena Chapel, interior north wall, top register | | Image |
| 54 |
 |
Arena Chapel, interior north wall, top register | | Image |
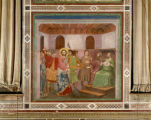
| 55 |
 |
Arena Chapel, interior south wall | | Image |
| 56 |
 |
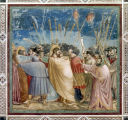
Arena Chapel, interior south wall, bottom register | | Image |
| 57 |
 |
Arena Chapel, interior south wall, bottom register | | Image |
| 58 |
 |
Arena Chapel, interior south wall, bottom register | | Image |
| 59 |
 |
Arena Chapel, interior south wall, bottom register | | Image |
| 60 |
 |
Arena Chapel, interior south wall, bottom register | | Image |
| 61 |
 |
Arena Chapel, interior south wall, middle register | | Image |
| 62 |
 |
Arena Chapel, interior south wall, middle register | | Image |
| 63 |
 |
Arena Chapel, interior south wall, middle register | | Image |
| 64 |
 |
Arena Chapel, interior south wall, middle register | | Image |
| 65 |
 |
Arena Chapel, interior south wall, middle register | | Image |
| 66 |
 |
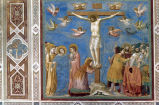
Arena Chapel, interior south wall, top register | | Image |
| 67 |
 |
Arena Chapel, interior south wall, top register | | Image |
| 68 |
 |
Arena Chapel, interior south wall, top register | | Image |
| 69 |
 |
Arena Chapel, interior south wall, top register | | Image |
| 70 |
 |
Arena Chapel, interior south wall, top register | | Image |
| 71 |
 |
Arena Chapel, interior south wall, top register | | Image |
| 72 |
 |
Arena Chapel, interior south wall, top register (detail 1) | | Image |
| 73 |
 |
Arena Chapel, interior south wall, top register (detail 2) | | Image |
| 74 |
 |
Arena Chapel, interior west wall over main entrance, detail | | Image |
| 75 |
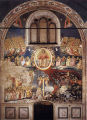 |
Arena Chapel, interior west wall, Last Judgment | | Image |
| 76 |
 |
Arena Chapel, interior, view toward entrance | | Image |
| 77 |
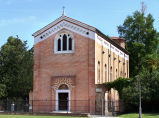 |
Arena Chapel, view from the west | | Image |
| 78 |
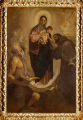
 |
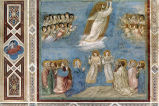
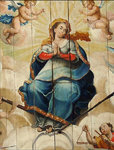
Assumption of the Virgin, with King David and Angelic Choir | | Image |
| 79 |
 |
Assumption of the Virgin, with King David and Angelic Choir | | Image |
| 80 |
 |
Assumption of the Virgin, with King David and Angelic Choir (detail) | | Image |
| 81 |
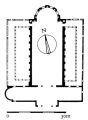 |
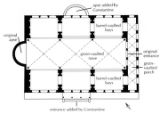
Aula Palatina (Basilica of Constantine), ground plan | | Image |
| 82 |
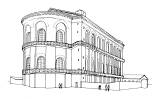 |
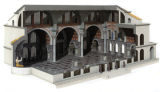
Aula Palatina (Basilica of Constantine), reconstruction drawing | | Image |
| 83 |
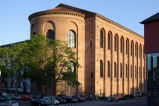 |
Aula Palatina (Basilica of Constantine), view from the north | | Image |
| 84 |
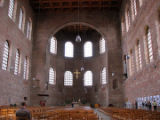 |
Aula Palatina (Basilica of Constantine), view of the nave from the main door | | Image |
| 85 |
 |
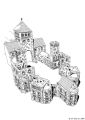
Bagan Temples | | Image |
| 86 |
 |
Bagan, Dhamma Ya Zika Pagoda complex | | Image |
| 87 |
 |
Bamberg Cathedral, exterior view from the east | | Image |
| 88 |
 |
Bamberg Cathedral, ground plan | | Image |
| 89 |
 |
Bamberg Cathedral, Mounted King | | Image |
| 90 |
 |
Bamberg Cathedral, view from the nave into the eastern choir | | Image |
| 91 |
 |
Baptistery of San Giovanni, Central Octagon | | Image |
| 92 |
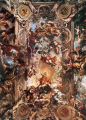 |
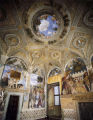
Barberini Palace (palazzo), great hall, ceiling, Glorification of the Reign of Pope Urban VIII | | Image |
| 93 |
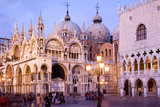 |
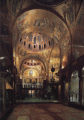
Basilica di San Marco (Saint Mark's) | | Image |
| 94 |
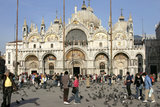 |
Basilica di San Marco (Saint Mark's) | | Image |
| 95 |
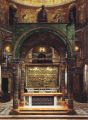 |
Basilica di San Marco (St. Mark's), Apse, Main Altar with the Pala d'Oro | | Image |
| 96 |
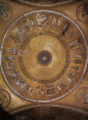 |
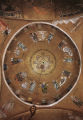
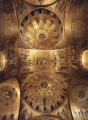
Basilica di San Marco (St. Mark's), Atrium, Abraham cupola, view from below | | Image |
| 97 |
 |
Basilica di San Marco (St. Mark's), Atrium, first Joseph cupola, view from below | | Image |
| 98 |
 |
Basilica di San Marco (St. Mark's), Atrium, Moses cupola, view from below | | Image |
| 99 |
 |
Basilica di San Marco (St. Mark's), Atrium, third Joseph cupola | | Image |
| 100 |
 |
Basilica di San Marco (St. Mark's), Atrium, third Joseph cupola, view from below | | Image |
| 101 |
 |
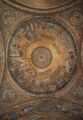
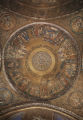
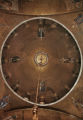
Basilica di San Marco (St. Mark's), central dome, view from below | | Image |
| 102 |
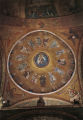 |
Basilica di San Marco (St. Mark's), east dome, view from below | | Image |
| 103 |
 |
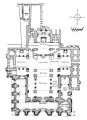
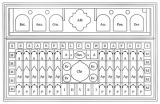
Basilica di San Marco (St. Mark's), general plan of the basilica showing the location of the principal mosaics | | Image |
| 104 |
 |
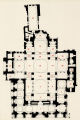
Basilica di San Marco (St. Mark's), groundplan | | Image |
| 105 |
 |
Basilica di San Marco (St. Mark's), left portal mosaic: Translation of the Relics of St. Mark | | Image |
| 106 |
 |
Basilica di San Marco (St. Mark's), Nave, view of the domes from the west | | Image |
| 107 |
 |
Basilica di San Marco (St. Mark's), Nave, view of the domes from the west | | Image |
| 108 |
 |
Basilica di San Marco (St. Mark's), north dome, view from below | | Image |
| 109 |
 |
Basilica di San Marco (St. Mark's), Pala d'Oro, decoration plan | | Image |
| 110 |
 |
Basilica di San Marco (St. Mark's), south dome, view from below | | Image |
| 111 |
 |
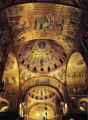
Basilica di San Marco (St. Mark's), view into the vaulting and cupolas | | Image |
| 112 |
 |
Basilica di San Marco (St. Mark's), view of the Nave and Barrel Vaults of the Central Crossing, showing the mosaics of the Crucifixion and Resurrection | | Image |
| 113 |
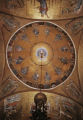 |
Basilica di San Marco (St. Mark's), west dome, view from below | | Image |
| 114 |
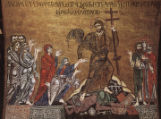 |
Basilica di San Marco (St. Mark's), west vault moasic: Anastasis (detail) | | Image |
| 115 |
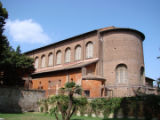 |
Basilica di Santa Sabina, exterior view | | Image |
| 116 |
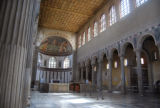 |
Basilica di Santa Sabina, interior view toward apse (1) | | Image |
| 117 |
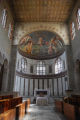 |
Basilica di Santa Sabina, interior view toward apse (2) | | Image |
| 118 |
 |
Basilica of Maxentius and Constantine (Basilica Nova), barrel-vaulted bay, detail of the coffering | | Image |
| 119 |
 |
Basilica of Maxentius and Constantine (Basilica Nova), cut-away drawing to show ground plan and exterior/interior volumes | | Image |
| 120 |
 |
Basilica of Maxentius and Constantine (Basilica Nova), cut-away drawing to show ground plan and interior space | | Image |
| 121 |
 |
Basilica of Maxentius and Constantine (Basilica Nova), drawing of the reconstructed view from ground level | | Image |
| 122 |
 |
Basilica of Maxentius and Constantine (Basilica Nova), exterior reconstruction | | Image |
| 123 |
 |
Basilica of Maxentius and Constantine (Basilica Nova), ground plan | | Image |
| 124 |
 |
Basilica of Maxentius and Constantine (Basilica Nova), restored cutaway view | | Image |
| 125 |
 |
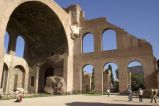
Basilica of Maxentius and Constantine (Basilica Nova), view from the east | | Image |
| 126 |
 |
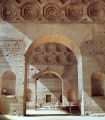
Basilica of Maxentius and Constantine (Basilica Nova), view into one of the nave bays | | Image |
| 127 |
 |
Basilica of Maxentius and Constantine (Basilica Nova), view of the ruins of three main nave bays | | Image |
| 128 |
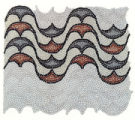 |
Basilica of Sant' Eufemia mosaic | | Image |
| 129 |
 |
Basilica of St. John, Stoudios Monastery (Imrahor Camii), groundplan | | Image |
| 130 |
 |
Basilica of St. John, Stoudios Monastery (Imrahor Camii), interior view facing north | | Image |
| 131 |
 |
Basilica of the Assumption, aerial view | | Image |
| 132 |
 |
Basilica of the Assumption, view of the central space towards the apse | | Image |
| 133 |
 |
Beauvais Cathedral, choir and transept from the south | | Image |
| 134 |
 |
Beauvais Cathedral, Choir model: photoelastic interference pattern produced by simulated wind loading | | Image |
| 135 |
 |
Beauvais Cathedral, cross section of the choir | | Image |
| 136 |
 |
Beauvais Cathedral, looking into the choir | | Image |
| 137 |
 |
Beauvais Cathedral, north side of the choir as completed in 1272 CE, reconstruction drawing | | Image |
| 138 |
 |
Beauvais Cathedral, plan in 1272 reconstructed | | Image |
| 139 |
 |
Beauvais Cathedral, vault of the choir | | Image |
| 140 |
 |
Benedictine Abbey of Notre Dame, Crypt of Saint Paul | | Image |
| 141 |
 |
Benedictine Plan | | Image |
| 142 |
 |
Benedictine Plan, artist's rendering of the church interior; view toward the apse | | Image |
| 143 |
 |
Benedictine Plan, artist's rendering of the interior of the refectory, view toards the east | | Image |
| 144 |
 |
Benedictine Plan, artist's rendering of the site according to the plan | | Image |
| 145 |
 |
Benedictine Plan, color-coded analysis | | Image |
| 146 |
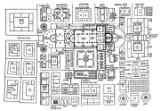
 |
Benedictine Plan, diagrammatic analysis of the five assembled parchment pieces | | Image |
| 147 |
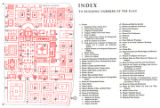
 |
Benedictine Plan, redrawn with identifications translated | | Image |
| 148 |
 |
Benedictine Plan, schematic diagram of the original plan | | Image |
| 149 |
 |
Bentivoglio Chapel, Virgin and Child with Saint Jerome and Saint Francis | | Image |
| 150 |
 |
Beth Alpha Synagogue, floor mosaic with Torah shrine, zodiac wheel, and the Sacrifice of Isaac | | Image |
| 151 |
 |
Beth Alpha Synagogue, model | | Image |
| 152 |
 |
Beth Alpha Synagogue, plan showing mosaic pavement | | Image |
| 153 |
 |
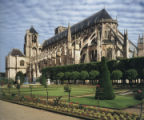
Bourges Cathedral, aerial view from the southwest | | Image |
| 154 |
 |
Bourges Cathedral, choir looking southeast | | Image |
| 155 |
 |
Bourges Cathedral, cross section of choir | | Image |
| 156 |
 |
Bourges Cathedral, cross section of choir showing lightpaths | | Image |
| 157 |
 |
Bourges Cathedral, detail of choir model: photoelastic interference pattern produced by simulated dead weight loading | | Image |
| 158 |
 |
Bourges Cathedral, nave looking east | | Image |
| 159 |
 |
Bourges Cathedral, nave looking east | | Image |
| 160 |
 |
Bourges Cathedral, portal area of the west facade | | Image |
| 161 |
 |
Bourges Cathedral, reconstructed original plan | | Image |
| 162 |
 |
Bourges Cathedral, section and elevation of four bays in the south side of the nave | | Image |
| 163 |
 |
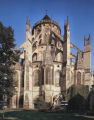
Bourges Cathedral, view from the southeast | | Image |
| 164 |
 |
Bourges Cathedral, view of the choir | | Image |
| 165 |
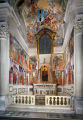 |
Brancacci Chapel, general view | | Image |
| 166 |
 |
Brancacci Chapel, interior, back wall to right of window, second register | | Image |
| 167 |
 |
Brancacci Chapel, interior, left wall | | Image |
| 168 |
 |
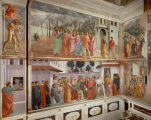
Brancacci Chapel, right wall, scenes from the life of St. Peter | | Image |
| 169 |
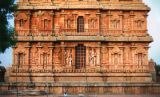 |
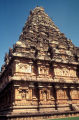
Brihadeshwara Temple | | Image |
| 170 |
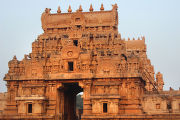 |
Brihadeshwara Temple | | Image |
| 171 |
 |
Brihadeshwara Temple | | Image |
| 172 |
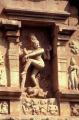 |
Brihadisvara Temple, south wall, Shiva as Nataraja | | Image |
| 173 |
 |
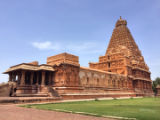
Brihadisvara Temple, view from southwest | | Image |
| 174 |
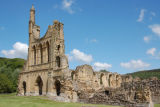 |
Byland Abbey, exterior view | | Image |
| 175 |
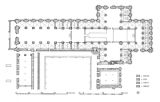 |
Byland Abbey, ground plan | | Image |
| 176 |
 |
Byland Abbey, reconstruction drawing of south transept | | Image |
| 177 |
 |
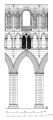
Byland Abbey, reconstruction of the south transept east elevation | | Image |
| 178 |
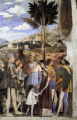 |
Camera picta (camera degli sposi), Arrival of Cardinal Francesco Gonzaga | | Image |
| 179 |
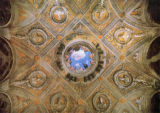 |
Camera picta (camera degli sposi), ceiling vault | | Image |
| 180 |
 |
Camera picta (camera degli sposi), ceiling vault | | Image |
| 181 |
 |
Camera picta (camera degli sposi), view of frescoed walls | | Image |
| 182 |
 |
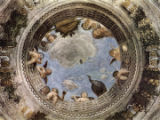
Camera picta (camera degli sposi), view of the ceiling vault | | Image |
| 183 |
 |
Campo Santo, Triumph of Death | | Image |
| 184 |
 |
Canterbury Cathedral, Ambulatory, window depicting St. Thomas Becket | | Image |
| 185 |
 |
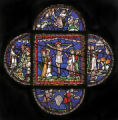
Canterbury Cathedral, Corona Redemption Window: Crucifixion | | Image |
| 186 |
 |
Canterbury Cathedral, Corona Redemption Window: Crucifixion (detail) | | Image |
| 187 |
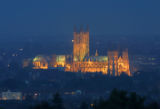 |
Canterbury Cathedral, distant view | | Image |
| 188 |
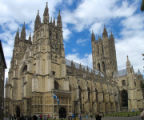 |
Canterbury Cathedral, exterior view | | Image |
| 189 |
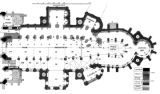 |
Canterbury Cathedral, ground plan | | Image |
| 190 |
 |
Canterbury Cathedral, head of the choir and Trinity Chapel | | Image |
| 191 |
 |
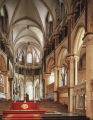
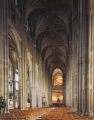
Canterbury Cathedral, Nave | | Image |
| 192 |
 |
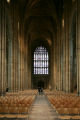
Canterbury Cathedral, nave looking east | | Image |
| 193 |
 |
Canterbury Cathedral, north aisle of presbytery and Trinity Chapel | | Image |
| 194 |
 |
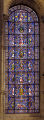
Canterbury Cathedral, North Quire Aisle Window | | Image |
| 195 |
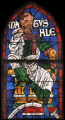 |
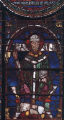
Canterbury Cathedral, Old Testament Patriarch Methuselah | | Image |
| 196 |
 |
Canterbury Cathedral, Presbytery and Trinity Chapel | | Image |
| 197 |
 |
Canterbury Cathedral, reconstruction drawing of summer 1175, after fire and before reconstruction | | Image |
| 198 |
 |
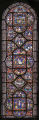
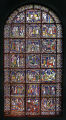
Canterbury Cathedral, Tree of Jesse window | | Image |
| 199 |
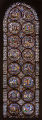 |
Canterbury Cathedral, Trinity Chapel Ambulatory Window | | Image |
| 200 |
 |
Canterbury Cathedral, Trinity Chapel Ambulatory Window | | Image |