|
|
Title | Date | Type |
| 1 |
 |
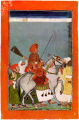
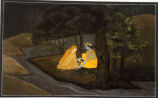
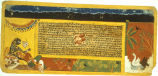
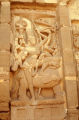
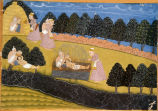
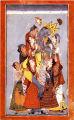
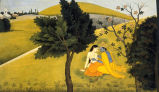
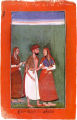
A Leisurely Ride: Mian Mukund Dev with Companions in the Countryside | | Image |
| 2 |
 |
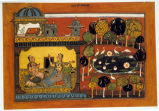
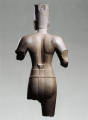
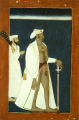
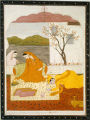
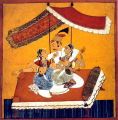
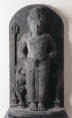
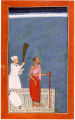
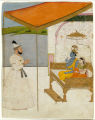
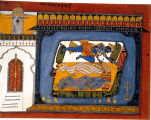
A Noble Praying in a Shaligrama Shrine | | Image |
| 3 |
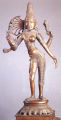 |
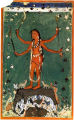
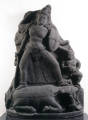
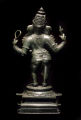
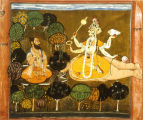
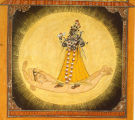
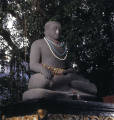
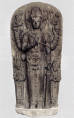
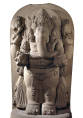
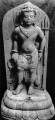
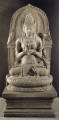
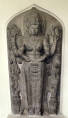
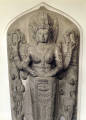
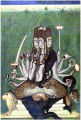
Ardhanarishvara | | Image |
| 4 |
 |
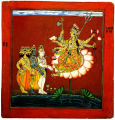
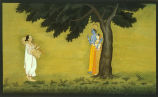
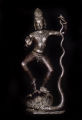
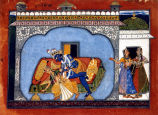
Balwant Singh Seeing a Painting with Nainsukh | | Image |
| 5 |
 |
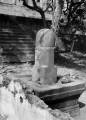
Balwant Singh Standing Smoking in his Garden | | Image |
| 6 |
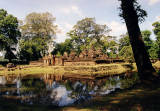 |
Banteay Srei Temple | | Image |
| 7 |
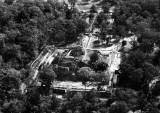 |
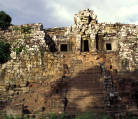
Baphuon, aerial view | | Image |
| 8 |
 |
Baphuon, central tower | | Image |
| 9 |
 |
Baphuon, exterior view 1 | | Image |
| 10 |
 |
Baphuon, exterior view 2 | | Image |
| 11 |
 |
Baphuon, exterior view 3 | | Image |
| 12 |
 |
Baphuon, exterior view 4 | | Image |
| 13 |
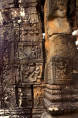 |
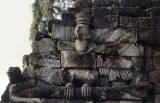
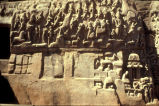
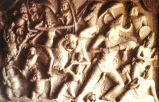
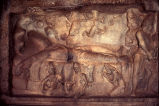
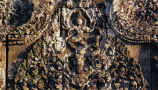
Baphuon, wall relief | | Image |
| 14 |
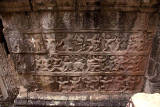 |
Baphuon, wall relief | | Image |
| 15 |
 |
Baphuon, wall relief | | Image |
| 16 |
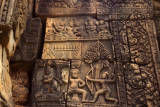 |
Baphuon, wall relief | | Image |
| 17 |
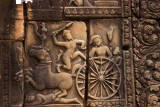 |
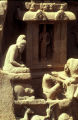
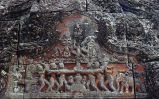
Baphuon, wall relief detail | | Image |
| 18 |
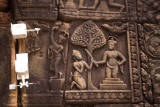 |
Baphuon, wall relief detail | | Image |
| 19 |
 |
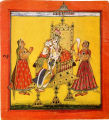
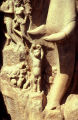
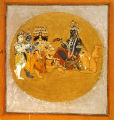
Bhadrakali accompanied by Indra, a Mortal, and a Demon King | | Image |
| 20 |
 |
Bhadrakali accompanied by Tripura-Bhairavi and an Acolyte Strewing Flowers | | Image |
| 21 |
 |
Bhadrakali Adored by the Gods | | Image |
| 22 |
 |
Bhadrakali adored by the Gods in the Mandela of the Sun | | Image |
| 23 |
 |
Bhadrakali and Retainers | | Image |
| 24 |
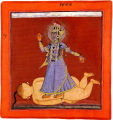 |
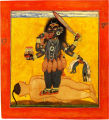
Bhadrakali Standing on a Corpse | | Image |
| 25 |
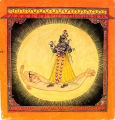 |
Bhadrakali within the Rising Sun | | Image |
| 26 |
 |
Bhadrakali, Destroyer of the Universe | | Image |
| 27 |
 |
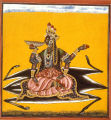
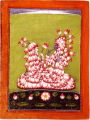
Bhagavati, Bestower of Wealth | | Image |
| 28 |
 |
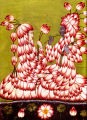
Bhuvaneshvari the Granter of Wishes | | Image |
| 29 |
 |
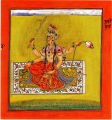
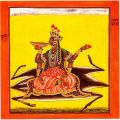
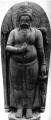
Brahma | | Image |
| 30 |
 |
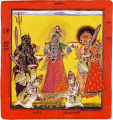
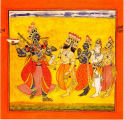
Brahma the Creator on his mount, the goose; Siva the Destroyer atop Nandi the bull; and Vishnu the Preserver, riding a garuda | | Image |
| 31 |
 |
Brihadisvara Temple, south wall, Shiva as Nataraja | | Image |
| 32 |
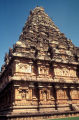 |
Brihadisvara Temple, view from southwest | | Image |
| 33 |
 |
Candi Ceto, View of Bat-Shaped Paving | | Image |
| 34 |
 |
Candi Jawi, View from the East | | Image |
| 35 |
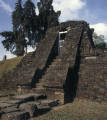 |
Candi Sukuh Pyramidal Entrance Gate | | Image |
| 36 |
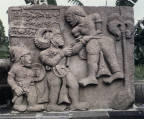 |
Candi Sukuh relief, Bhima attacks a Demon | | Image |
| 37 |
 |
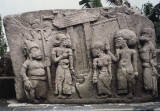
Candi Sukuh relief, Durga Threatening Sadewa in a Cemetery | | Image |
| 38 |
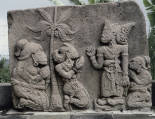 |
Candi Sukuh relief, Sadewa kneeling before a Heavenly Being | | Image |
| 39 |
 |
Candi Sukuh relief, Sadewa kneels before liberated Durga | | Image |
| 40 |
 |
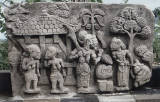
Candi Sukuh relief, The Hermit and his Daughter greet Sadewa at a Hermitage | | Image |
| 41 |
 |
Candi Sukuh, Garuda Clutching Snakes | | Image |
| 42 |
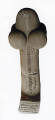 |
Candi Sukuh, Giant Linga | | Image |
| 43 |
 |
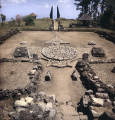
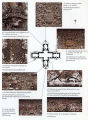
Candi Sukuh, Ground Plan of Third Terrace | | Image |
| 44 |
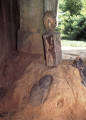 |
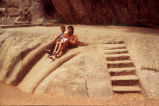
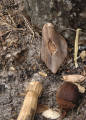
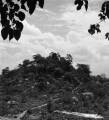
Carved Termite Hill | | Image |
| 45 |
 |
Dancing Bhadrakali Adored by the Gods | | Image |
| 46 |
 |
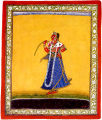
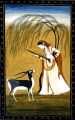
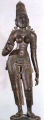
Dancing Devi (Mahadevi, the Great Goddess) | | Image |
| 47 |
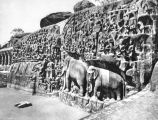 |
Descent of the Ganges | | Image |
| 48 |
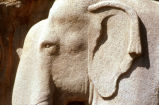 |
Descent of the Ganges, detail of right half, Head of Elephant | | Image |
| 49 |
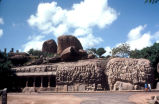 |
Descent of the Ganges, view from northeast | | Image |
| 50 |
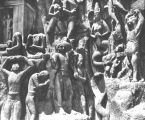 |
Descent of the Ganges: Ascetics and Magas | | Image |
| 51 |
 |
Descent of the Ganges: Children's Slide (detail near right end), Monkey Family (rear) | | Image |
| 52 |
 |
Descent of the Ganges: detail of left half | | Image |
| 53 |
 |
Descent of the Ganges: detail of left half, Vishnu in Shrine | | Image |
| 54 |
 |
Descent of the Ganges: detail of right half, Cat doing Penance, Mice as Devotees | | Image |
| 55 |
 |
Descent of the Ganges: detail of right half, Ghandarvas and Animals in Forest | | Image |
| 56 |
 |
Devi adored by the Gods | | Image |
| 57 |
 |
Devi Dark as the Night of Dissolution | | Image |
| 58 |
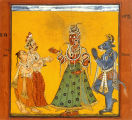 |
Devi Receiving the Homage of Gods and Demons Alike | | Image |
| 59 |
 |
Devi Seated on a Lotus | | Image |
| 60 |
 |
The Devi Transcending Time | | Image |
| 61 |
 |
Devi, Giver of Joy | | Image |
| 62 |
 |
Disguising her Real Intent: The Parakiya Heroine | | Image |
| 63 |
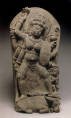 |
Durga | | Image |
| 64 |
 |
Durga Killing the Bull-Demon | | Image |
| 65 |
 |
Durga Slaying the Demon Mahisha | | Image |
| 66 |
 |
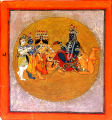
Durga standing on a lotus altar, receiving the worship of the king and Mahatmya (central icon) | | Image |
| 67 |
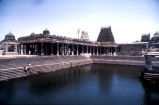 |
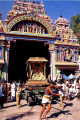
Ekambaranathar Temple, Temple Tank, Nandi & Kalyana Mandpa | | Image |
| 68 |
 |
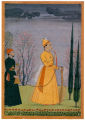
The Emperor Aurangzeb Reading from the Quran | | Image |
| 69 |
 |
Equestrian Portrait of Raja Shamsher Sen of Mandi | | Image |
| 70 |
 |
The Eyes lowered to the bed of Lotus-Leaves | | Image |
| 71 |
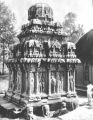 |
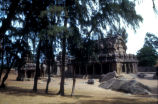
The Five Rathas, Arjuna Rath of the Pandava Raths | | Image |
| 72 |
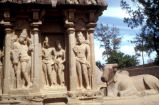 |
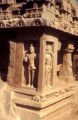
The Five Rathas, Arjuna Ratha, east wall | | Image |
| 73 |
 |
The Five Rathas, Arjuna Ratha, rear view from northwest | | Image |
| 74 |
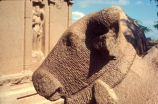 |
The Five Rathas, detail of head | | Image |
| 75 |
 |
The Five Rathas, Dharmaraja Ratha, corner detail | | Image |
| 76 |
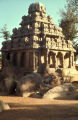 |
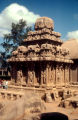
The Five Rathas, Dharmaraja Ratha, view from southeast | | Image |
| 77 |
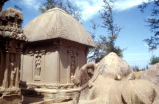 |
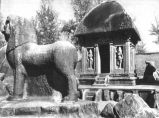
The Five Rathas, Draupadi Ratha and Monolithic Bull, view from southeast | | Image |
| 78 |
 |
The Five Rathas, Durga cell of the Pandava Raths | | Image |
| 79 |
 |
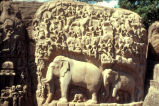
The Five Rathas, Monolithic Elephant and Sahadeva Ratha | | Image |
| 80 |
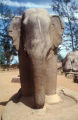 |
The Five Rathas, Monolithic Elephant, view from the south | | Image |
| 81 |
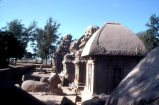 |
The Five Rathas, view from northeast | | Image |
| 82 |
 |
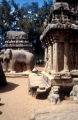
The Five Rathas, view from southwest | | Image |
| 83 |
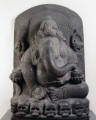 |
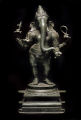
Ganesha | | Image |
| 84 |
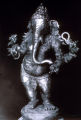 |
Ganesha | | Image |
| 85 |
 |
Ganesha (back view) | | Image |
| 86 |
 |
Ganesha (back view) | | Image |
| 87 |
 |
Ganesha (front view) | | Image |
| 88 |
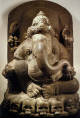 |
Ganesha Seated on a Row of Cranes | | Image |
| 89 |
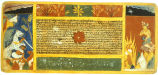 |
The Goddess Consigns a Demon to the Flames (folio 15r) | | Image |
| 90 |
 |
The Goddess Dances | | Image |
| 91 |
 |
The Goddess Mahishasuramardini | | Image |
| 92 |
 |
The Goddess slays the Mahishasurs, the Buffalo-Demon (folio 2r) | | Image |
| 93 |
 |
The Goddess Worshiped by Rishi Chyavana | | Image |
| 94 |
 |
The Goddess Worshiped by the Sage Rishi Chyavana | | Image |
| 95 |
 |
The Gods Pay Homage to Bhadrakali | | Image |
| 96 |
 |
The Gods Pay Homage to Bhadrakali (detail) | | Image |
| 97 |
 |
The Great Goddess, Gentle and Triumphant | | Image |
| 98 |
 |
Harihara, back view | | Image |
| 99 |
 |
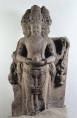
Harihara, front view | | Image |
| 100 |
 |
Harihara, three-quarters view | | Image |
| 101 |
 |
Hazards and Portents (folio 13r) | | Image |
| 102 |
 |
In a Languid Mood (folio 17r) | | Image |
| 103 |
 |
Indrakshi Seated on a Lotus Flower, Adored by the Gods | | Image |
| 104 |
 |
Informal Portrait of Raja Sidh Sen | | Image |
| 105 |
 |
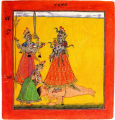
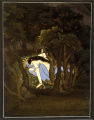
Jayadeva's Vision of Radha and Krishna | | Image |
| 106 |
 |
Joko Dolog, the Jina Buddha Akshobhya | | Image |
| 107 |
 |
Kailasanatha Temple, south wall, Durga Mahishasuramardini | | Image |
| 108 |
 |
Kalaratri Seated on an Antelope skin | | Image |
| 109 |
 |
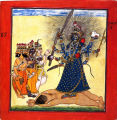
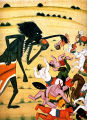
Kali Attacks on the Battlefield | | Image |
| 110 |
 |
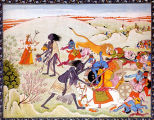
Kali on the battlefield fighting Chanda's and Munda's armies | | Image |
| 111 |
 |
Kali on the battlefield fighting Chanda's and Munda's armies (detail) | | Image |
| 112 |
 |
Kbal Spean Linga-Yoni Rock Carving | | Image |
| 113 |
 |
King Dasharatha Cremates Shiravana and his Aged Parents | | Image |
| 114 |
 |
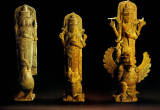
King Kertarajasa as Harihara | | Image |
| 115 |
 |
Kishan, front view, detail of upper part of body | | Image |
| 116 |
 |
Krishna begs Radha's Forgiveness | | Image |
| 117 |
 |
Krishna Dancing on Kaliya | | Image |
| 118 |
 |
Krishna with a cluster of Gopis | | Image |
| 119 |
 |
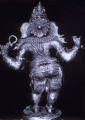
Large Standing Ganesha | | Image |
| 120 |
 |
Like Holding Quicksilver: The Mugdha Heroine | | Image |
| 121 |
 |
Linga Stone | | Image |
| 122 |
 |
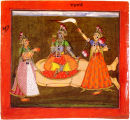
Lotus-Clad Radha and Krishna | | Image |
| 123 |
 |
Lotus-Clad Radha and Krishna (detail) | | Image |
| 124 |
 |
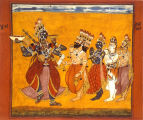
The Love-Play of Radha and Krishna | | Image |
| 125 |
 |
Madendrapotradirajan & Wives | | Image |
| 126 |
 |
Mahakala | | Image |
| 127 |
 |
Mahishasuramardini, Mandapa, Vishnu Anantasayana | | Image |
| 128 |
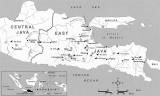 |
Map: Sites of Buddhist and Hindu Temples in Central and East Java | | Image |
| 129 |
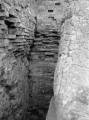 |
Megalith (partial view) inside the Temple of Thma Doh | | Image |
| 130 |
 |
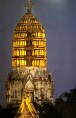
Minakshi-Sundareshvara Temple Complex, view from South Gopuram | | Image |
| 131 |
 |
Minakshi-Sundareshvara Temple, South Gopuram (16th Century), northeast view with "Golden Lily Pond" | | Image |
| 132 |
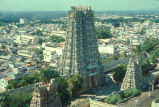 |
Minakshi-Sundareshvara Temple, view of West Gopuram from top of South Gopuram | | Image |
| 133 |
 |
Mumba Devi Temple | | Image |
| 134 |
 |
Music in the Night: Balwant Singh Listening to Music | | Image |
| 135 |
 |
The Musical Mode: Raga Vinoda | | Image |
| 136 |
 |
The Musical Mode: Ragini Todi | | Image |
| 137 |
 |
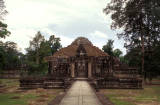
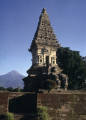
Muvar Kovil, rear view from northeast | | Image |
| 138 |
 |
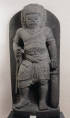
Nandisvara | | Image |
| 139 |
 |
Nandisvara | | Image |
| 140 |
 |
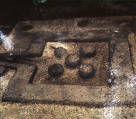
Offerings in the Image of Male and Female Sexual Organs | | Image |
| 141 |
 |
Parvati Goddess | | Image |
| 142 |
 |
Phallic Megalith | | Image |
| 143 |
 |
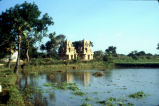
Phnom Kailâs represented by the local mountain Phnom Thma Doh | | Image |
| 144 |
 |
Playing to Delight her Heart | | Image |
| 145 |
 |
The Poet Bihari Offers Homage to Radha and Krishna | | Image |
| 146 |
 |
Portrait of Manku | | Image |
| 147 |
 |
Portrait of Pandit Seu | | Image |
| 148 |
 |
Portrait of Raja Shamsher Sen of Mandi | | Image |
| 149 |
 |
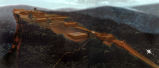
Preah Vihear: Aerial View of the Enclosure of the 4th Level including the Central Sanctuary seen from the Southwest | | Image |
| 150 |
 |
Preah Vihear: Carving Details | | Image |
| 151 |
 |
Preah Vihear: Causeway | | Image |
| 152 |
 |
Preah Vihear: Floorplan of the 2nd Level Gopura to the 3rd Level Gopura | | Image |
| 153 |
 |
Preah Vihear: Floorplan of the Gopura on the 2nd Level | | Image |
| 154 |
 |
Preah Vihear: Graffiti of Vishnu and Naga | | Image |
| 155 |
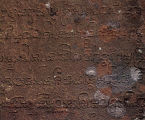 |
Preah Vihear: Inscription K380 on the Doorjam of the Southern Door of the Gopura of the 4th Level | | Image |
| 156 |
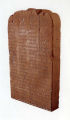 |
Preah Vihear: Inscription K382 | | Image |
| 157 |
 |
Preah Vihear: Inside the Gopura Looking towards the Southern Door (above which is a pediment carved with Umamaheshvara) | | Image |
| 158 |
 |
Preah Vihear: Lion Head Reservoir | | Image |
| 159 |
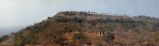 |
Preah Vihear: Looking South along Preah Vihear Promontory from Mo Ee Daeng | | Image |
| 160 |
 |
Preah Vihear: Monumental Stairway Floor Plan | | Image |
| 161 |
 |
Preah Vihear: Panoramic Drawing | | Image |
| 162 |
 |
Preah Vihear: Part of the South Gopura and Southeast Gallery seen from Peuy Ta Di | | Image |
| 163 |
 |
Preah Vihear: Pediment Showing Krishna Lifting Mount Govardhana | | Image |
| 164 |
 |
Preah Vihear: Plan Showing the Location of Preah Vihear on the Promontory of the Dangrek Mountain | | Image |
| 165 |
 |
Preah Vihear: Second Pillared Causeway | | Image |
| 166 |
 |
Preah Vihear: Shiva Dancing over the Head of an Elephant over a Kala | | Image |
| 167 |
 |
Preah Vihear: Site Plan | | Image |
| 168 |
 |
Preah Vihear: The Churning of the Ocean of Milk | | Image |
| 169 |
 |
Preah Vihear: The Mandapa seen from the North | | Image |
| 170 |
 |
Preah Vihear: The Mandapa within the Central Enclosure; to the Right is the West Gallery | | Image |
| 171 |
 |
Preah Vihear: Top Courtyard Floorplan | | Image |
| 172 |
 |
Preah Vihear: View of Cambodia from Peuy Ta Di Cliff | | Image |
| 173 |
 |
Preah Vihear: Vishnu Anatasayin (Vishnu Reclining on the Naga Ananta) from the Southern Exit of the Gopura on the 2nd Level | | Image |
| 174 |
 |
Queen Ken Dedes as Prajnaparamita | | Image |
| 175 |
 |
Queen Tribhuwana as Parvati | | Image |
| 176 |
 |
Queen Tribhuwana as Parvati (detail) | | Image |
| 177 |
 |
Raja Balwant Singh of Jasrota about to Smite a Tiger | | Image |
| 178 |
 |
Raja Balwant Singh of Jasrota Astride a Bay Horse | | Image |
| 179 |
 |
Raja Balwant Singh of Jasrota Hearing a Submission | | Image |
| 180 |
 |
Raja Balwant Singh of Jasrota Offering Homage to Radha and Krishna Enthroned | | Image |
| 181 |
 |
Raja Balwant Singh of Jasrota on a Lion Hunt | | Image |
| 182 |
 |
Raja Balwant Singh of Jasrota Relaxing in front of a Fireplace | | Image |
| 183 |
 |
Raja Balwant Singh on a Hunting Expedition | | Image |
| 184 |
 |
Raja Shamsher Sen with Companions in female Garb | | Image |
| 185 |
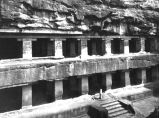 |
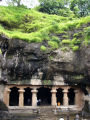
Ravana Ka Khai, view of Cave 14 | | Image |
| 186 |
 |
Reaching out Stealthily: The Patient Dhira Heroine | | Image |
| 187 |
 |
Sadashiva, the Great God with Five Faces | | Image |
| 188 |
 |
The Seer Ternavinda | | Image |
| 189 |
 |
Self Portrait | | Image |
| 190 |
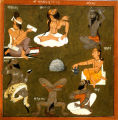 |
The Seven Great Sages | | Image |
| 191 |
 |
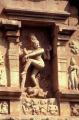
Shiva as Nataraja (Lord of Dance) | | Image |
| 192 |
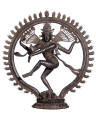 |
Shiva as Nataraja (Lord of Dance) | | Image |
| 193 |
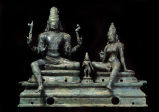 |
Shiva as Somaskanda (with Uma and Skanda) | | Image |
| 194 |
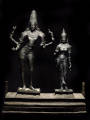 |
Shiva as Tripuravijaya (Victor of Three Cities) and Consort | | Image |
| 195 |
 |
Shiva Temple at Elephanta, main entrance to the caves | | Image |
| 196 |
 |
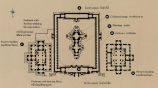
Shiva Temple at Elephanta, plan | | Image |
| 197 |
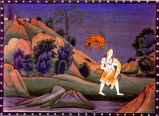 |
Shiva Wanders the Earth Carrying Sati's Body | | Image |
| 198 |
 |
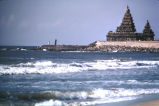
Shore Temple | | Image |
| 199 |
 |
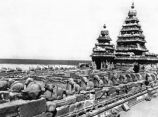
Shore Temple (India), view from southeast | | Image |
| 200 |
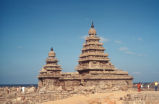 |
Shore Temple, view from southeast | | Image |