|
|
Title | Date | Type | Setname |
| 1 |
 |
A master sculpts in the specific details of the Buddha image's face after the second layer of malleable wax has been applied | | Image | uu_aah_art |
| 2 |
 |
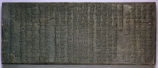
A Monk Holds on of 81,137 Wooden Printing Blocks Preserved in the Library at Hae'in-sa Temple | | Image | uu_aah_art |
| 3 |
 |
A Novice Forest Monk Meditating Beneath a Mosquito Net at Wat Parelai | | Image | uu_aah_art |
| 4 |
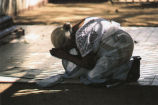 |
A Pilgrim Prays before the Bo-Tree | | Image | uu_aah_art |
| 5 |
 |
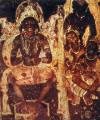
Ajanta Cave 10: Worship of the Buddha | | Image | uu_aah_art |
| 6 |
 |
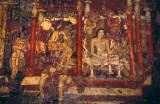
Ajanta Cave 16: The Conversion of Nanda | | Image | uu_aah_art |
| 7 |
 |
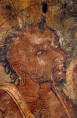
Ajanta Cave 17 Porch, Wheel of Rebirth | | Image | uu_aah_art |
| 8 |
 |
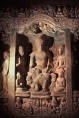
Ajanta Cave 17 Porch, Wheel of Rebirth detail: Couple and Tree | | Image | uu_aah_art |
| 9 |
 |
Ajanta Cave 17 Porch, Wheel of Rebirth detail: Garuda with Snake in its Beak | | Image | uu_aah_art |
| 10 |
 |
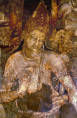
Ajanta Cave 17 wall painting depicting the story of the Buudha's previous life as Vessantara, a king of legendary generosity | | Image | uu_aah_art |
| 11 |
 |
Ajanta Cave 19: Chaitya Facade | | Image | uu_aah_art |
| 12 |
 |
Ajanta Cave 19: View of Facade | | Image | uu_aah_art |
| 13 |
 |
Ajanta Cave 1: Buddha's Hands in Dharmacakra Mudra (shrine detail) | | Image | uu_aah_art |
| 14 |
 |
Ajanta Cave 1: Seated Bodhisattva | | Image | uu_aah_art |
| 15 |
 |
Ajanta Cave 1: Seated Bodhisattva (detail) | | Image | uu_aah_art |
| 16 |
 |
Ajanta Cave 1: Vajrapani Attendant (Rear wall of Hall, to the right of the Buddha) | | Image | uu_aah_art |
| 17 |
 |
Ajanta Cave 2: Hall Shrine with Hariti | | Image | uu_aah_art |
| 18 |
 |
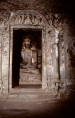
Ajanta Cave 4, Buddha Shrine in the Vihara | | Image | uu_aah_art |
| 19 |
 |
Ajanta Caves Exterior | | Image | uu_aah_art |
| 20 |
 |
Ajanta Caves Exterior | | Image | uu_aah_art |
| 21 |
 |
Ajanta Caves Exterior | | Image | uu_aah_art |
| 22 |
 |
Ajanta Caves Exterior | | Image | uu_aah_art |
| 23 |
 |
Ajanta Caves Exterior | | Image | uu_aah_art |
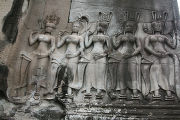
| 24 |
 |
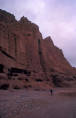
Ajanta Caves Interior | | Image | uu_aah_art |
| 25 |
 |
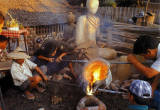
Ajanta Caves Interior | | Image | uu_aah_art |
| 26 |
 |
Ajanta Caves Interior | | Image | uu_aah_art |
| 27 |
 |
Ajanta Caves Interior | | Image | uu_aah_art |
| 28 |
 |
Ajanta Caves Interior | | Image | uu_aah_art |
| 29 |
 |
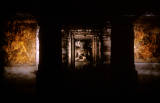
Ajanta Caves Interior, View to Stupa | | Image | uu_aah_art |
| 30 |
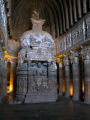 |
Ajanta Caves Interior, View to Stupa | | Image | uu_aah_art |
| 31 |
 |
Ajanta Caves Interior, View to Stupa | | Image | uu_aah_art |
| 32 |
 |
Ajanta Caves Wall Painting | | Image | uu_aah_art |
| 33 |
 |
Ajanta Caves Wall Painting | | Image | uu_aah_art |
| 34 |
 |
Ajanta Caves Wall Painting | | Image | uu_aah_art |
| 35 |
 |
Ajanta Caves Wall Painting | | Image | uu_aah_art |
| 36 |
 |
Ajanta Caves Wall Painting | | Image | uu_aah_art |
| 37 |
 |
Ajanta Caves Wall Painting | | Image | uu_aah_art |
| 38 |
 |
Ajanta Caves Wall Painting (detail) | | Image | uu_aah_art |
| 39 |
 |
Ajanta Caves Wall Painting (detail) | | Image | uu_aah_art |
| 40 |
 |
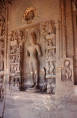
Ajanta Caves, Buddha | | Image | uu_aah_art |
| 41 |
 |
Ajanta Caves, Buddha Niche | | Image | uu_aah_art |
| 42 |
 |
Ajanta Caves, Buddha Niche | | Image | uu_aah_art |
| 43 |
 |
Ajanta Caves, Buddha Niche | | Image | uu_aah_art |
| 44 |
 |
Ajanta Caves, Buddha Niche | | Image | uu_aah_art |
| 45 |
 |
Ajanta Caves, Reclining Buddha | | Image | uu_aah_art |
| 46 |
 |
Ajanta Caves: Approach up the Wahgora River Gorge | | Image | uu_aah_art |
| 47 |
 |
Ajanta Caves: Caves 1 - 14, from the Wahgora River Bed | | Image | uu_aah_art |
| 48 |
 |
Ajanta Caves: Caves 14 - 28, seen from the Sat Kund Falls | | Image | uu_aah_art |
| 49 |
 |
Ajanta Caves: General View from the South over the Wahgora River Gorge | | Image | uu_aah_art |
| 50 |
 |
Ajanta Caves: General View of Caves 1 - 29 | | Image | uu_aah_art |
| 51 |
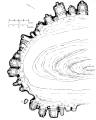 |
Ajanta Caves: Ground Plan | | Image | uu_aah_art |
| 52 |
 |
Ajanta Caves: Sat Kund Falls, at the west end of the Wahgora River Gorge | | Image | uu_aah_art |
| 53 |
 |
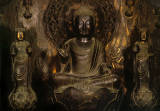
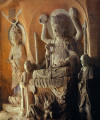
Altar Group with Sakyamuni and Attendants | | Image | uu_aah_art |
| 54 |
 |
Amida (Amitabha) Triad | | Image | uu_aah_art |
| 55 |
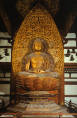 |
Amida Nyorai | | Image | uu_aah_art |
| 56 |
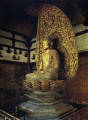 |
Amida Nyorai (Buddha) | | Image | uu_aah_art |
| 57 |
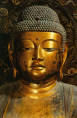 |
Amida Nyorai (detail of head) | | Image | uu_aah_art |
| 58 |
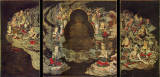 |
Amida Raigō Triptych | | Image | uu_aah_art |
| 59 |
 |
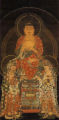
Amitabha and the Eight Great Bodhisattvas | | Image | uu_aah_art |
| 60 |
 |
Amitabha Buddha | | Image | uu_aah_art |
| 61 |
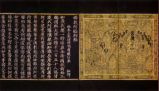 |
Amitabha Sutra | | Image | uu_aah_art |
| 62 |
 |
Amitabha Sutra and Dharani of Pure Land | | Image | uu_aah_art |
| 63 |
 |
Amitabha Triad | | Image | uu_aah_art |
| 64 |
 |
Ananda Standing beside the Buddha reclining on His Deathbed | | Image | uu_aah_art |
| 65 |
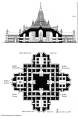 |
Ananda Temple Plan and Elevation | | Image | uu_aah_art |
| 66 |
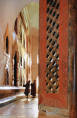 |
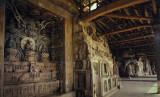
Ananda Temple, Outer Corridor and 18th Century Wooden Doorway | | Image | uu_aah_art |
| 67 |
 |
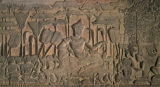
Angkor Thom, Bayon, relief: Battle Scene | | Image | uu_aah_art |
| 68 |
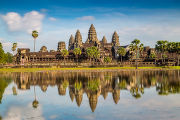 |
Angkor Wat | | Image | uu_aah_art |
| 69 |
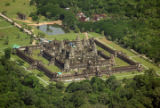 |
Angkor Wat, aerial view | | Image | uu_aah_art |
| 70 |
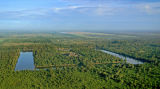 |
Angkor Wat, aerial view of site and surrounding countryside | | Image | uu_aah_art |
| 71 |
 |
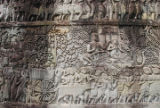
Angkor Wat, relief: King Suryavarman II Holds Court | | Image | uu_aah_art |
| 72 |
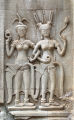 |
Angkor Wat: Apsaras Relief | | Image | uu_aah_art |
| 73 |
 |
Angkor Wat: Apsaras Relief | | Image | uu_aah_art |
| 74 |
 |
Approach to Giant Buddhas | | Image | uu_aah_art |
| 75 |
 |
Arhat | | Image | uu_aah_art |
| 76 |
 |
Artisans examining the mold of a Buddha image | | Image | uu_aah_art |
| 77 |
 |
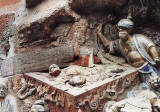
Artisans pour molten bronze from a crucible into one of two holes at the base of a large image mold | | Image | uu_aah_art |
| 78 |
 |
The Assault of Mara | | Image | uu_aah_art |
| 79 |
 |
Assimilation theory examined: its effectiveness in explaining the Japanese American religious experience | 1992-08 | Text | ir_htca |
| 80 |
 |
The Attack of Māra and the Enlightenment of the Bodhisattva | | Image | uu_aah_art |
| 81 |
 |
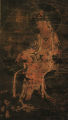
Autumn Foliage Along a River | | Image | uu_aah_art |
| 82 |
 |
Avalokiteshvara | | Image | uu_aah_art |
| 83 |
 |
Avalokiteshvara | | Image | uu_aah_art |
| 84 |
 |
Avalokiteshvara | | Image | uu_aah_art |
| 85 |
 |
Avatamsaka Sutra | | Image | uu_aah_art |
| 86 |
 |
Bagan Temples | | Image | uu_aah_art |
| 87 |
 |
Bagan, Dhamma Ya Zika Pagoda complex | | Image | uu_aah_art |
| 88 |
 |
Baodingshan, Hell of Boiling Cauldron | | Image | uu_aah_art |
| 89 |
 |
Baodingshan, Hell of Excrement | | Image | uu_aah_art |
| 90 |
 |
Baodingshan, Hell of the Blade Boat | | Image | uu_aah_art |
| 91 |
 |
Baodingshan, Hell of the Blade Boat | | Image | uu_aah_art |
| 92 |
 |
Baodingshan, Hell of the Iron Wheel | | Image | uu_aah_art |
| 93 |
 |
Baodingshan, Hell of the Spear, or Impaling Hell | | Image | uu_aah_art |
| 94 |
 |
Baodingshan, Punishments depicted below the Tribunals | | Image | uu_aah_art |
| 95 |
 |
Baodingshan, Punishments depicted below the Tribunals | | Image | uu_aah_art |
| 96 |
 |
Baodingshan, Scene of Seduction and Murder, from Hell Tribunals and Punishments | | Image | uu_aah_art |
| 97 |
 |
Baodingshan, The Ten Kings of Hell | | Image | uu_aah_art |
| 98 |
 |
Baodingshan, The Ten Kings of Hell | | Image | uu_aah_art |
| 99 |
 |
Beishan, general view | | Image | uu_aah_art |
| 100 |
 |
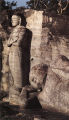
Beishan, Sun and Moon Avalokitesvara | | Image | uu_aah_art |