|
|
Title | Date | Type | Setname |
| 601 |
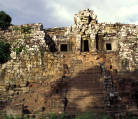 |
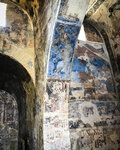
Baphuon, exterior view 4 | | Image | uu_aah_art |
| 602 |
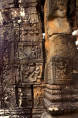 |
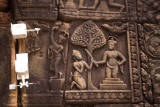
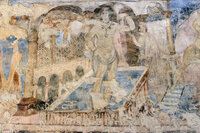
Baphuon, wall relief | | Image | uu_aah_art |
| 603 |
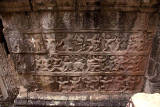 |
Baphuon, wall relief | | Image | uu_aah_art |
| 604 |
 |
Baphuon, wall relief | | Image | uu_aah_art |
| 605 |
 |
Baphuon, wall relief | | Image | uu_aah_art |
| 606 |
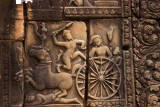 |
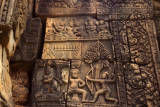
Baphuon, wall relief detail | | Image | uu_aah_art |
| 607 |
 |
Baphuon, wall relief detail | | Image | uu_aah_art |
| 608 |
 |
Baptistery of San Giovanni, Central Octagon | | Image | uu_aah_art |
| 609 |
 |
Basilica (Herculaneum) fresco, Theseus triumphant | | Image | uu_aah_art |
| 610 |
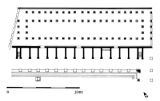 |
Basilica Aemilia, ground plan | | Image | uu_aah_art |
| 611 |
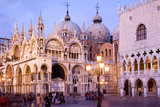 |
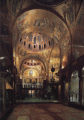
Basilica di San Marco (Saint Mark's) | | Image | uu_aah_art |
| 612 |
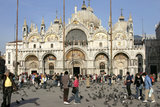 |
Basilica di San Marco (Saint Mark's) | | Image | uu_aah_art |
| 613 |
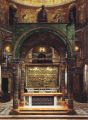 |
Basilica di San Marco (St. Mark's), Apse, Main Altar with the Pala d'Oro | | Image | uu_aah_art |
| 614 |
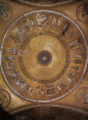 |
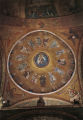
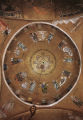
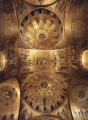
Basilica di San Marco (St. Mark's), Atrium, Abraham cupola, view from below | | Image | uu_aah_art |
| 615 |
 |
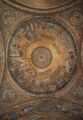
Basilica di San Marco (St. Mark's), Atrium, first Joseph cupola, view from below | | Image | uu_aah_art |
| 616 |
 |
Basilica di San Marco (St. Mark's), Atrium, Moses cupola, view from below | | Image | uu_aah_art |
| 617 |
 |
Basilica di San Marco (St. Mark's), Atrium, third Joseph cupola | | Image | uu_aah_art |
| 618 |
 |
Basilica di San Marco (St. Mark's), Atrium, third Joseph cupola, view from below | | Image | uu_aah_art |
| 619 |
 |
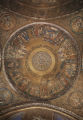
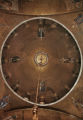
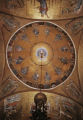
Basilica di San Marco (St. Mark's), central dome, view from below | | Image | uu_aah_art |
| 620 |
 |
Basilica di San Marco (St. Mark's), east dome, view from below | | Image | uu_aah_art |
| 621 |
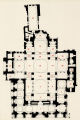 |
Basilica di San Marco (St. Mark's), general plan of the basilica showing the location of the principal mosaics | | Image | uu_aah_art |
| 622 |
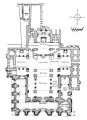 |
Basilica di San Marco (St. Mark's), groundplan | | Image | uu_aah_art |
| 623 |
 |
Basilica di San Marco (St. Mark's), Nave, view of the domes from the west | | Image | uu_aah_art |
| 624 |
 |
Basilica di San Marco (St. Mark's), Nave, view of the domes from the west | | Image | uu_aah_art |
| 625 |
 |
Basilica di San Marco (St. Mark's), north dome, view from below | | Image | uu_aah_art |
| 626 |
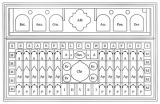 |
Basilica di San Marco (St. Mark's), Pala d'Oro, decoration plan | | Image | uu_aah_art |
| 627 |
 |
Basilica di San Marco (St. Mark's), south dome, view from below | | Image | uu_aah_art |
| 628 |
 |
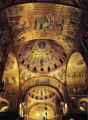
Basilica di San Marco (St. Mark's), view into the vaulting and cupolas | | Image | uu_aah_art |
| 629 |
 |
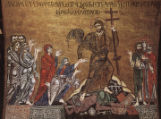
Basilica di San Marco (St. Mark's), view of the Nave and Barrel Vaults of the Central Crossing, showing the mosaics of the Crucifixion and Resurrection | | Image | uu_aah_art |
| 630 |
 |
Basilica di San Marco (St. Mark's), west dome, view from below | | Image | uu_aah_art |
| 631 |
 |
Basilica di San Marco (St. Mark's), west vault moasic: Anastasis (detail) | | Image | uu_aah_art |
| 632 |
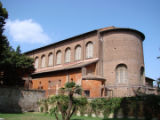 |
Basilica di Santa Sabina, exterior view | | Image | uu_aah_art |
| 633 |
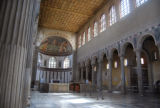 |
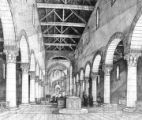
Basilica di Santa Sabina, interior view toward apse (1) | | Image | uu_aah_art |
| 634 |
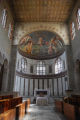 |
Basilica di Santa Sabina, interior view toward apse (2) | | Image | uu_aah_art |
| 635 |
 |
Basilica Julia, ground plan | | Image | uu_aah_art |
| 636 |
 |
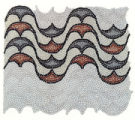
Basilica of Maxentius and Constantine (Basilica Nova), barrel-vaulted bay, detail of the coffering | | Image | uu_aah_art |
| 637 |
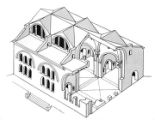 |
Basilica of Maxentius and Constantine (Basilica Nova), cut-away drawing to show ground plan and exterior/interior volumes | | Image | uu_aah_art |
| 638 |
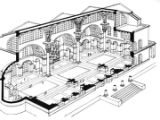 |
Basilica of Maxentius and Constantine (Basilica Nova), cut-away drawing to show ground plan and interior space | | Image | uu_aah_art |
| 639 |
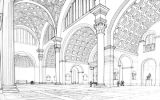 |
Basilica of Maxentius and Constantine (Basilica Nova), drawing of the reconstructed view from ground level | | Image | uu_aah_art |
| 640 |
 |
Basilica of Maxentius and Constantine (Basilica Nova), exterior reconstruction | | Image | uu_aah_art |
| 641 |
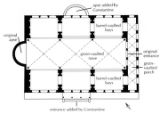 |
Basilica of Maxentius and Constantine (Basilica Nova), ground plan | | Image | uu_aah_art |
| 642 |
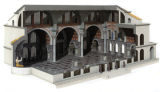 |
Basilica of Maxentius and Constantine (Basilica Nova), restored cutaway view | | Image | uu_aah_art |
| 643 |
 |
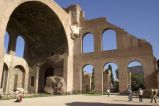
Basilica of Maxentius and Constantine (Basilica Nova), view from the east | | Image | uu_aah_art |
| 644 |
 |
Basilica of Maxentius and Constantine (Basilica Nova), view into one of the nave bays | | Image | uu_aah_art |
| 645 |
 |
Basilica of Maxentius and Constantine (Basilica Nova), view of the ruins of three main nave bays | | Image | uu_aah_art |
| 646 |
 |
Basilica of Sant' Eufemia mosaic | | Image | uu_aah_art |
| 647 |
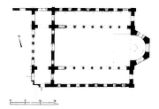 |
Basilica of St. John, Stoudios Monastery (Imrahor Camii), groundplan | | Image | uu_aah_art |
| 648 |
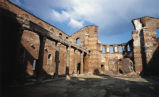 |
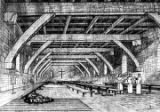
Basilica of St. John, Stoudios Monastery (Imrahor Camii), interior view facing north | | Image | uu_aah_art |
| 649 |
 |
Basilica of the Assumption, aerial view | | Image | uu_aah_art |
| 650 |
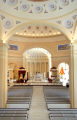 |
Basilica of the Assumption, view of the central space towards the apse | | Image | uu_aah_art |
| 651 |
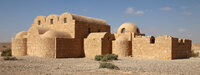 |
Bathhouse at Qusayr ʿAmra | | Image | uu_aah_art |
| 652 |
 |
Bathhouse at Qusayr ʿAmra, wall paintings | | Image | uu_aah_art |
| 653 |
 |
Bathhouse at Qusayr ʿAmra, wall paintings | | Image | uu_aah_art |
| 654 |
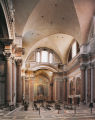 |
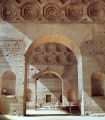
Baths of Diocletian, central hall | | Image | uu_aah_art |
| 655 |
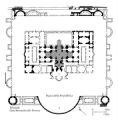 |
Baths of Diocletian, ground plan | | Image | uu_aah_art |
| 656 |
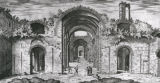 |
Baths of Diocletian, Rome | | Image | uu_aah_art |
| 657 |
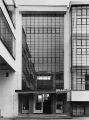 |
Bauhaus Building, Main Entry | | Image | uu_aah_art |
| 658 |
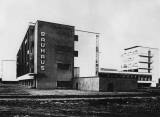 |
The Bauhaus Buildings, Dessau | | Image | uu_aah_art |
| 659 |
 |
Bauhaus Dessau | | Image | uu_aah_art |
| 660 |
 |
Bauhaus Dessau | | Image | uu_aah_art |
| 661 |
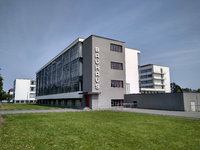 |
Bauhaus Dessau | | Image | uu_aah_art |
| 662 |
 |
Bauhaus Dessau, aerial view | | Image | uu_aah_art |
| 663 |
 |
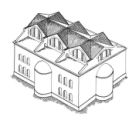
Bauhaus Dessau, model | | Image | uu_aah_art |
| 664 |
 |
Bauhaus Workshop | | Image | uu_aah_art |
| 665 |
 |
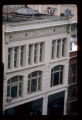
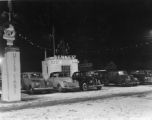
Beason Building at Night, Copy of Print | 1926-03-17 | Image/StillImage | dha_scnpp |
| 666 |
 |
Beason Building, South Side at Night | 1925-12-31 | Image/StillImage | dha_scnpp |
| 667 |
 |
Beason Building, South Side at Night | 1925-12-31 | Image/StillImage | dha_scnpp |
| 668 |
 |
Beauvais Cathedral, choir and transept from the south | | Image | uu_aah_art |
| 669 |
 |
Beauvais Cathedral, Choir model: photoelastic interference pattern produced by simulated wind loading | | Image | uu_aah_art |
| 670 |
 |
Beauvais Cathedral, cross section of the choir | | Image | uu_aah_art |
| 671 |
 |
Beauvais Cathedral, looking into the choir | | Image | uu_aah_art |
| 672 |
 |
Beauvais Cathedral, north side of the choir as completed in 1272 CE, reconstruction drawing | | Image | uu_aah_art |
| 673 |
 |
Beauvais Cathedral, plan in 1272 reconstructed | | Image | uu_aah_art |
| 674 |
 |
Beauvais Cathedral, vault of the choir | | Image | uu_aah_art |
| 675 |
 |
Bedford Park | | Image | uu_aah_art |
| 676 |
 |
Beehive House | 1986 | Image/StillImage | dha_crvs |
| 677 |
 |
Beehive House | 1980; 1981; 1982; 1983; 1984; 1985; 1986; 1987; 1988; 1989; 1990 | Image/StillImage | dha_crvs |
| 678 |
 |
Beehive House | 1980; 1981; 1982; 1983; 1984; 1985; 1986; 1987; 1988; 1989; 1990 | Image/StillImage | dha_crvs |
| 679 |
 |
Beehive House | 1980; 1981; 1982; 1983; 1984; 1985; 1986; 1987; 1988; 1989; 1990 | Image/StillImage | dha_crvs |
| 680 |
 |
Beehive House | 1986 | Image/StillImage | dha_crvs |
| 681 |
 |
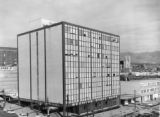
Beehive State Bank P.1 | 1960; 1961; 1962 | Image/StillImage | dha_cp |
| 682 |
 |
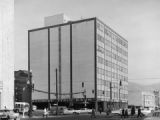
Beehive State Bank P.2 | 1961-12-01 | Image/StillImage | dha_cp |
| 683 |
 |
Beehive State Bank P.3 | 1962-12-01 | Image/StillImage | dha_cp |
| 684 |
 |
Beehive State Bank P.4 | 1962-12-01 | Image/StillImage | dha_cp |
| 685 |
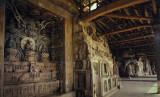 |
Beishan, general view | | Image | uu_aah_art |
| 686 |
 |
Belvedere Apartmemts. Exterior of South Side | 1920-05-20 | Image/StillImage | dha_scnpp |
| 687 |
 |
Belverdere Apartments | 1920-05-20 | Image/StillImage | dha_scnpp |
| 688 |
 |
Benedictine Abbey of Notre Dame, Crypt of Saint Paul | | Image | uu_aah_art |
| 689 |
 |
Benedictine Plan | | Image | uu_aah_art |
| 690 |
 |
Benedictine Plan, artist's rendering of the church interior; view toward the apse | | Image | uu_aah_art |
| 691 |
 |
Benedictine Plan, artist's rendering of the interior of the refectory, view toards the east | | Image | uu_aah_art |
| 692 |
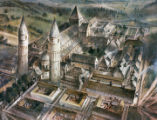 |
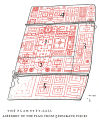
Benedictine Plan, artist's rendering of the site according to the plan | | Image | uu_aah_art |
| 693 |
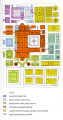 |
Benedictine Plan, color-coded analysis | | Image | uu_aah_art |
| 694 |
 |
Benedictine Plan, diagrammatic analysis of the five assembled parchment pieces | | Image | uu_aah_art |
| 695 |
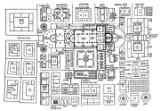 |
Benedictine Plan, redrawn with identifications translated | | Image | uu_aah_art |
| 696 |
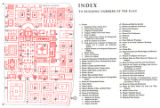 |
Benedictine Plan, schematic diagram of the original plan | | Image | uu_aah_art |
| 697 |
 |
Bennett Glass and Paint | 1986 | Image/StillImage | dha_crvs |
| 698 |
 |
Bennett Glass and Paint | 1986 | Image/StillImage | dha_crvs |
| 699 |
 |
Bennett Motor Co. P.3 | 1940-12-23 | Image/StillImage | dha_cp |
| 700 |
 |
Bernard Stewart Residence | 1920; 1921; 1922; 1923; 1924; 1925; 1926; 1927; 1928; 1929; 1930 | Image | dha_twpc |