|
|
Title | Date | Type |
| 1 |
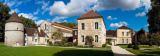 |
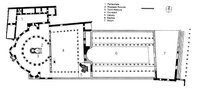
Abbey of Fontenay | | Image |
| 2 |
 |
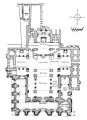
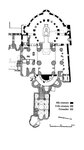
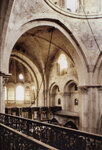
Abbey of Fontenay, ground plan | | Image |
| 3 |
 |
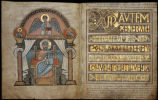
Abraham in front of an Altar | | Image |
| 4 |
 |
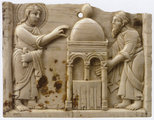
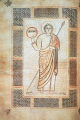
Apparition to the Disciples / Pentecost | | Image |
| 5 |
 |
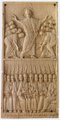
Ascension Plaque (fragment) | | Image |
| 6 |
 |
Atlas of Maritime Charts (The Catalan Atlas) | | Image |
| 7 |
 |
Atlas of Maritime Charts (The Catalan Atlas), detail showing Mansa Musa | | Image |
| 8 |
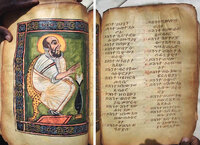 |
Author portrait of St. Mark (left), chapter titles from the book of Mark (right) | | Image |
| 9 |
 |
Author portrait of St. Mark, Garima Gospels | | Image |
| 10 |
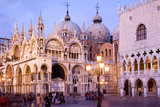 |
Basilica di San Marco (Saint Mark's) | | Image |
| 11 |
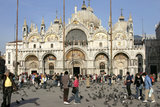 |
Basilica di San Marco (Saint Mark's) | | Image |
| 12 |
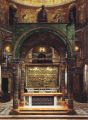 |
Basilica di San Marco (St. Mark's), Apse, Main Altar with the Pala d'Oro | | Image |
| 13 |
 |
Basilica di San Marco (St. Mark's), general plan of the basilica showing the location of the principal mosaics | | Image |
| 14 |
 |
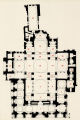
Basilica di San Marco (St. Mark's), groundplan | | Image |
| 15 |
 |
Basilica di San Marco (St. Mark's), Pala d'Oro | | Image |
| 16 |
 |
Basilica di San Marco (St. Mark's), Pala d'Oro, center detail: Enthroned Pantokrator (Pantocrator) | | Image |
| 17 |
 |
Bayeux Tapestry | | Image |
| 18 |
 |
Bayeux Tapestry | | Image |
| 19 |
 |
Bayeux Tapestry | | Image |
| 20 |
 |
Bayeux Tapestry | | Image |
| 21 |
 |
Bayeux Tapestry | | Image |
| 22 |
 |
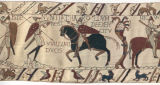
Bayeux Tapestry: scene 13: Here Wido led Harold to William Duke of the Normans | | Image |
| 23 |
 |
Bayeux Tapestry: scene 13: Here Wido led Harold to William Duke of the Normans | | Image |
| 24 |
 |
Bayeux Tapestry: scene 14: Here Duke William comes with Harold to his palace | | Image |
| 25 |
 |
Bayeux Tapestry: scene 16: Here Duke William and his army came to the Mount of Michael | | Image |
| 26 |
 |
Bayeux Tapestry: scene 17: and here they crossed the Couesnon River, Here Duke Harold dragged them from the sand | | Image |
| 27 |
 |
Bayeux Tapestry: scene 18: and they came to Dol and Conan turned in flight | | Image |
| 28 |
 |
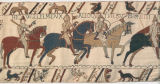
Bayeux Tapestry: scene 2-3: Where Harold, duke of the English, and his knights ride to Bosham Church | | Image |
| 29 |
 |
Bayeux Tapestry: scene 2-3: Where Harold, duke of the English, and his knights ride to Bosham Church | | Image |
| 30 |
 |
Bayeux Tapestry: scene 21: Here William gave arms to Harold | | Image |
| 31 |
 |
Bayeux Tapestry: scene 22-23: Here William came to Bayeux, Where Harold made an oath to Duke William | | Image |
| 32 |
 |
Bayeux Tapestry: scene 35: Here Duke William ordered ships to be built | | Image |
| 33 |
 |
Bayeux Tapestry: scene 35: Here Duke William ordered ships to be built | | Image |
| 34 |
 |
Bayeux Tapestry: scene 36: Here they drag the ships to the sea | | Image |
| 35 |
 |
Bayeux Tapestry: scene 4-5: Here Harold sailed by sea and with sails filled with wind came to the land of Count Wido | | Image |
| 36 |
 |
Bayeux Tapestry: scene 43: Here they had a feast, And here the bishop blesses the food and drink | | Image |
| 37 |
 |
Bayeux Tapestry: scene 44-45: Bishop Odo, William, Robert, He ordered that a motte should be dug at Hastings | | Image |
| 38 |
 |
Bayeux Tapestry: scene 49: Here Duke William asks Vitalis if he has seen Harold's army | | Image |
| 39 |
 |
Bayeux Tapestry: scene 4: Here Harold sailed by sea | | Image |
| 40 |
 |
Bayeux Tapestry: scene 50: This man tells King Harold about Duke William's army | | Image |
| 41 |
 |
Bayeux Tapestry: scene 50: This man tells King Harold about Duke William's army | | Image |
| 42 |
 |
Bayeux Tapestry: scene 51: Here Duke William speaks to his knights to prepare themselves manfully and wisely for the battle against the army of the English | | Image |
| 43 |
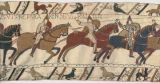 |
Bayeux Tapestry: scene 51: Here Duke William speaks to his knights to prepare themselves manfully and wisely for the battle against the army of the English | | Image |
| 44 |
 |
Bayeux Tapestry: scene 51: Here Duke William speaks to his knights to prepare themselves manfully and wisely for the battle against the army of the English | | Image |
| 45 |
 |
Bayeux Tapestry: scene 53: Here English and French fell at the same time in battle | | Image |
| 46 |
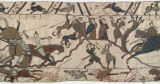 |
Bayeux Tapestry: scene 53: Here English and French fell at the same time in battle | | Image |
| 47 |
 |
Bayeux Tapestry: scene 54: Here Bishop Odo, holding a club, gives strength to the boys | | Image |
| 48 |
 |
Bayeux Tapestry: scene 55-56: Here is Duke William, Eustace | | Image |
| 49 |
 |
Bayeux Tapestry: scene 5: and with sails filled with wind came to the land of Count Wido | | Image |
| 50 |
 |
Beatus of Fernando and Sancha: Destruction of Babylon | | Image |
| 51 |
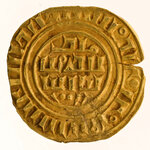 |
Besant with imitation Fatimid legend | | Image |
| 52 |
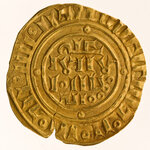 |
Besant with imitation Fatimid legend | | Image |
| 53 |
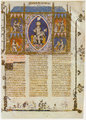 |
Bible historiale: Christ Enthroned and the Four Evangelists | | Image |
| 54 |
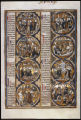 |
Bible Moraliseé (Moralized Bible): Conclusion of the Apocalypse | | Image |
| 55 |
 |
Bible Moraliseé (Moralized Bible): Conclusion of the Apocalypse, the King of France (Louis VIII), and the Maker of the Bible Moraliseé | | Image |
| 56 |
 |
Bobbio Pilgrimage Flask | | Image |
| 57 |
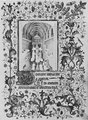 |
Book of Hours: Mass for the Dead | | Image |
| 58 |
 |
Book of the Properties of Things: Health Man | | Image |
| 59 |
 |
Bowl used as architectural decoration | | Image |
| 60 |
 |
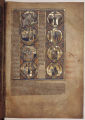
Breviary of Philip the Fair: Coronation of David, David and Goliath | | Image |
| 61 |
 |
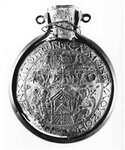
Bronze seal matrix (right) and wax impression (left) | | Image |
| 62 |
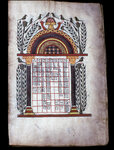 |
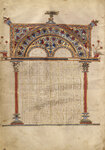
Canon Table | | Image |
| 63 |
 |
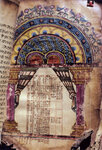
Canon Table | | Image |
| 64 |
 |
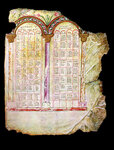
Canon table from the Garima Gospels | | Image |
| 65 |
 |
Canon Table, Garima Gospels | | Image |
| 66 |
 |
The Canon, a folio from the Georgian Adysh Gospels | | Image |
| 67 |
 |
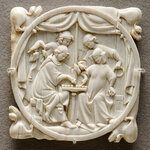
Canterbury Leaf: Twelve scenes from the Christmas story, from the Annunciation to the Shepherds to the Death of Herod | | Image |
| 68 |
 |
Cathedral of Saint Peter, Saint George's Choir, Devil blinding a Jew (column beneath Synagoga) | | Image |
| 69 |
 |
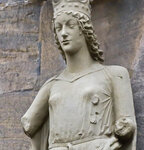
Cathedral of Saint Peter, Saint George's Choir, Ecclesia | | Image |
| 70 |
 |
Cathedral of Saint Peter, Saint George's Choir, Ecclesia (detail) | | Image |
| 71 |
 |
Cathedral of Saint Peter, Saint George's Choir, Evangelist symbols (column beneath Ecclesia) | | Image |
| 72 |
 |
Cathedral of Saint Peter, Saint George's Choir, Synagoga | | Image |
| 73 |
 |
Cathedral of Saint Peter, Saint George's Choir, Synagoga (detail) | | Image |
| 74 |
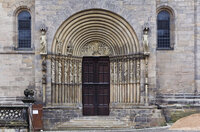 |
Cathedral of Saints Peter and George (Bamberg Cathedral), Fürstenportal north façade | | Image |
| 75 |
 |
Cathedral of Saints Peter and George (Bamberg Cathedral), Fürstenportal north façade, tympanum: Last Judgment | | Image |
| 76 |
 |
Cathedral of Saints Peter and George (Bamberg Cathedral), view of interior | | Image |
| 77 |
 |
Chasuble (Opus Anglicanum) | | Image |
| 78 |
 |
Chasuble (Opus Anglicanum) detail | | Image |
| 79 |
 |
Chasuble (Opus Anglicanum) detail | | Image |
| 80 |
 |
Chess Game Mirror Case | | Image |
| 81 |
 |
Chessboard | | Image |
| 82 |
 |
Chilperic II Diploma | | Image |
| 83 |
 |
Christ on the Cross | | Image |
| 84 |
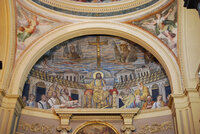 |
Church of Santa Pudenziana, apse mosaic | | Image |
| 85 |
 |
Church of the Holy Sepulchre, Byzantine plan | | Image |
| 86 |
 |
Church of the Holy Sepulchre, Constantinian plan | | Image |
| 87 |
 |
Church of the Holy Sepulchre, Crusader Plans | | Image |
| 88 |
 |
Church of the Holy Sepulchre, interior view | | Image |
| 89 |
 |
Clavis Physicae: The Creation of the World | | Image |
| 90 |
 |
Codex Aureus: Portrait of St. Matthew and Decorated Text of the Gospel of St. Matthew starting at Matthew 1:18 | | Image |
| 91 |
 |
Comb with Lovers in a garden | | Image |
| 92 |
 |
Commentary on the Psalms: King David as a Warrior (Psalm 51) | | Image |
| 93 |
 |
Commentary on the Psalms: King David Playing the Lyre (Psalm 101) | | Image |
| 94 |
 |
Copenhagen Gospels: St. Matthew | | Image |
| 95 |
 |
Coronation Mantle of King Roger II of Sicily | | Image |
| 96 |
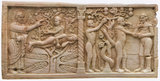 |
Creation of Eve / Temptation and Fall | | Image |
| 97 |
 |
Creation of Light and Darkness / Creation of the Firmament | | Image |
| 98 |
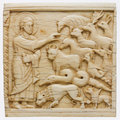 |
Creation of the Animals | | Image |
| 99 |
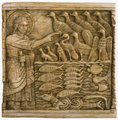 |
Creation of the Birds and Fish | | Image |
| 100 |
 |
Creation of the Plants and Trees / Creation of the Sun, the Moon, and the Stars | | Image |