|
|
Title | Date | Type |
| 1 |
 |
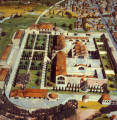
Aerial View of Pompeii | | Image |
| 2 |
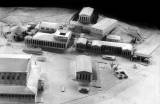 |
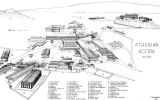
Agora, model of the site showing the view from the east | | Image |
| 3 |
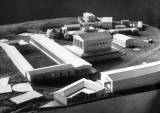 |
Agora, model of the site showing the view from the southeast | | Image |
| 4 |
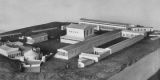 |
Agora, model of the site showing the view from the southwest | | Image |
| 5 |
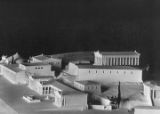 |
Agora, model of the site showing the view of the west side from the northeast | | Image |
| 6 |
 |
Agora, reconstructed view from the west | | Image |
| 7 |
 |
Al-Khazneh (Treasury), general view | | Image |
| 8 |
 |
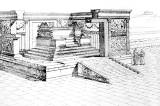
Altar of the Augustan Peace (Ara Pacis Augustae), axonometric view | | Image |
| 9 |
 |
Altar of the Augustan Peace (Ara Pacis Augustae), cut-away drawing to show the altar in the interior | | Image |
| 10 |
 |
Altar of the Augustan Peace (Ara Pacis Augustae), ground plan showing the location of sculptured panels and the later outer Hadrianic precinct | | Image |
| 11 |
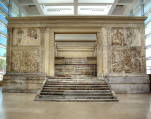 |
Altar of the Augustan Peace (Ara Pacis Augustae), view of the west entrance | | Image |
| 12 |
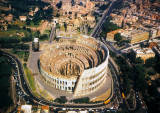 |
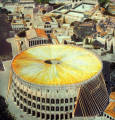
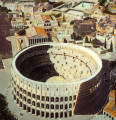
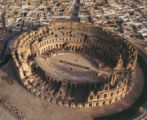
Amphitheater (Colosseum), aerial view | | Image |
| 13 |
 |
Amphitheater (Colosseum), drawing of the mechanics controlling the movable roof or velarium | | Image |
| 14 |
 |
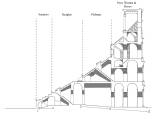
Amphitheater (Colosseum), ground plan of the subterranean levels | | Image |
| 15 |
 |
Amphitheater (Colosseum), reconstruction drawing of the animal cage system | | Image |
| 16 |
 |
Amphitheater (Colosseum), restoration drawing of the arena with a lion combat and spectators | | Image |
| 17 |
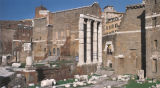
 |
Amphitheater (Colosseum), restoration drawing of the structure with the movable roof (velarium) | | Image |
| 18 |
 |
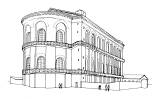
Amphitheater (Colosseum), restoration drawing of the structure, aerial view | | Image |
| 19 |
 |
Amphitheater (Colosseum), seating plan for the different economic classes of society | | Image |
| 20 |
 |
Amphitheater (Colosseum), sectional view | | Image |
| 21 |
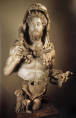
 |
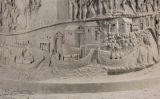
Amphitheater (Colosseum), view of the barrel vaulted hallways | | Image |
| 22 |
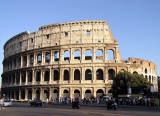 |
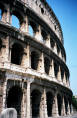
Amphitheater (Colosseum), view of the façade | | Image |
| 23 |
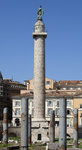
 |
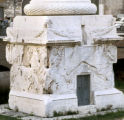
Amphitheater (Colosseum), view of the façade (night) | | Image |
| 24 |
 |
Amphitheater (Colosseum), view of the ruins of the arena area | | Image |
| 25 |
 |
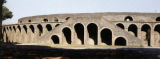
Amphitheater (El Djem), aerial view | | Image |
| 26 |
 |
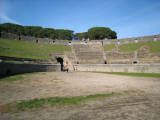
Amphitheater (Pompeii), aerial view | | Image |
| 27 |
 |
Amphitheater (Pompeii), facade with double stairway | | Image |
| 28 |
 |
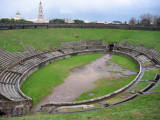
Amphitheater (Pompeii), view of seats and field | | Image |
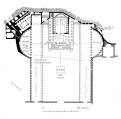
| 29 |
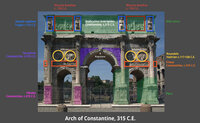 |
Arch of Constantine | | Image |
| 30 |
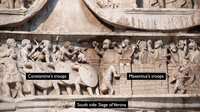 |
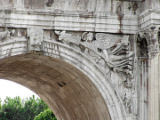
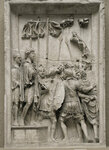
Arch of Constantine (south side): Frieze with Constinatine's siege of Maxentius's troops at Verona | | Image |
| 31 |
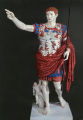
 |
Arch of Constantine (south side): Frieze with Constinatine's siege of Maxentius's troops at Verona | | Image |
| 32 |
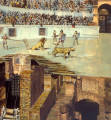
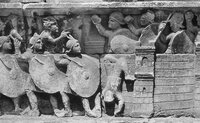 |
Arch of Constantine (south side): Frieze with Constinatine's siege of Maxentius's troops at Verona | | Image |
| 33 |
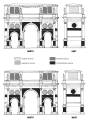 |
Arch of Constantine, diagram of the reused pieces (spolia) installed on the four faces | | Image |
| 34 |
 |
Arch of Constantine, East Roundel: Sol Invictus | | Image |
| 35 |
 |
Arch of Constantine, Primary Spandrels: Victory and Personification of Autumn | | Image |
| 36 |
 |
Arch of Constantine, Primary Spandrels: Victory and Personification of Spring | | Image |
| 37 |
 |
Arch of Constantine, Primary Spandrels: Victory and Personification of Summer | | Image |
| 38 |
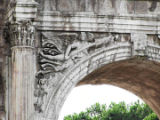 |
Arch of Constantine, Primary Spandrels: Victory and Personification of Winter | | Image |
| 39 |
 |
Arch of Constantine, Secondary Spandrels: River Gods | | Image |
| 40 |
 |
Arch of Constantine, Secondary Spandrels: River Gods | | Image |
| 41 |
 |
Arch of Constantine, West Roundel: Luna | | Image |
| 42 |
 |
Arch of Constantine, West Roundel: Luna | | Image |
| 43 |
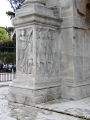 |
Arch of Constantine: Pedestal 1 | | Image |
| 44 |
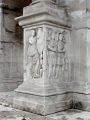 |
Arch of Constantine: Pedestal 2 | | Image |
| 45 |
 |
Arch of Constantine: Pedestal 3 | | Image |
| 46 |
 |
Arch of Constantine: Pedestal 4 | | Image |
| 47 |
 |
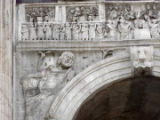
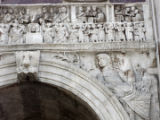
Arch of Constantine: Relief panel on the south side attic: Two barbarian prisoners of the Marcomanic War led before Emperor Marcus Aurelius | | Image |
| 48 |
 |
Arch of Sergii | | Image |
| 49 |
 |
Arch of Titus, side of arch: Roman troops carry off spoils from the Jerusalem synagogue | | Image |
| 50 |
 |
Arch of Trajan, general view | | Image |
| 51 |
 |
Augustus Forum, ground plan | | Image |
| 52 |
 |
Augustus Forum, Mars Ultor Temple, exterior view | | Image |
| 53 |
 |
Augustus of Primaporta, reconstruction of original polychromy | | Image |
| 54 |
 |
Aula Palatina (Basilica of Constantine), reconstruction drawing | | Image |
| 55 |
 |
Basilica (Herculaneum) fresco, Theseus triumphant | | Image |
| 56 |
 |
Basilica of Maxentius and Constantine (Basilica Nova), exterior reconstruction | | Image |
| 57 |
 |
Caligula | | Image |
| 58 |
 |
Caracalla Baths (Thermae Antoninian), drawing of the central hall (frigidarium) | | Image |
| 59 |
 |
Caracalla Baths (Thermae Antoninianae), aerial view of the ruins | | Image |
| 60 |
 |
Caracalla Baths (Thermae Antoninianae), colored drawing of the reconstructed volumes | | Image |
| 61 |
 |
Caracalla Baths (Thermae Antoninianae), colored drawing of the restored structure, aerial view | | Image |
| 62 |
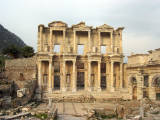 |
Celsus Library, view of the main façade | | Image |
| 63 |
 |
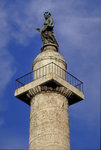
Column of Marcus Aurelius | | Image |
| 64 |
 |
Column of Trajan, detail of St. Peter | | Image |
| 65 |
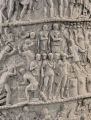 |
Column of Trajan, detail: Dacian prisoners brought before the emperor in front of a Roman camp | | Image |
| 66 |
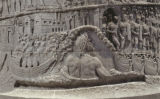 |
Column of Trajan, detail: River god, personification of the Danube, with the Roman army crossing a pontoon bridge | | Image |
| 67 |
 |
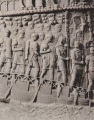
Column of Trajan, detail: Testudo formation of the Roman army as it attacks a Dacian fortress | | Image |
| 68 |
 |
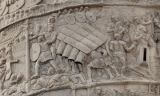
Column of Trajan, detail: The Roman army crossing the Danube on a pontoon bridge | | Image |
| 69 |
 |
Column of Trajan, detail: Watchtowers and Dacian houses along the Danube | | Image |
| 70 |
 |
Column of Trajan, general view | | Image |
| 71 |
 |
Column of Trajan, pedestal | | Image |
| 72 |
 |
Commodus | | Image |
| 73 |
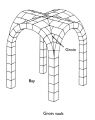 |
Diagram of a groin vault showing the parts | | Image |
| 74 |
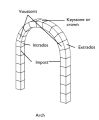 |
Diagram of a round-headed arch showing the keystone | | Image |
| 75 |
 |
Diagram of a tunnel or barrel vault showing the parts | | Image |
| 76 |
 |
Diagram of dome pendentives and squinches | | Image |
| 77 |
 |
Diagram of groin and tunnel / barrel vaults | | Image |
| 78 |
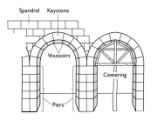 |
Diagram of the parts of a round-headed arch with a drawing of the centering | | Image |
| 79 |
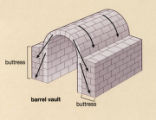 |
Diagram of thrusts exerted on a barrel vault with buttressed walls | | Image |
| 80 |
 |
Diagrams of groin, quadripartite rib, and complex rib vaults | | Image |
| 81 |
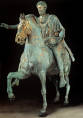 |
Equestrian Statue of Marcus Aurelius | | Image |
| 82 |
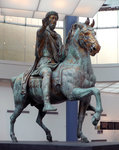 |
Equestrian Statue of Marcus Aurelius | | Image |
| 83 |
 |
Equestrian Statue of Marcus Aurelius | | Image |
| 84 |
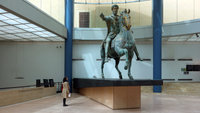 |
Equestrian Statue of Marcus Aurelius | | Image |
| 85 |
 |
Field of Mars (Campus Martius), reconstruction drawing showing the Horologium and the Ara Pacis | | Image |
| 86 |
 |
Fortified Wall (England), general view | | Image |
| 87 |
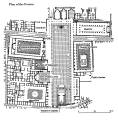 |
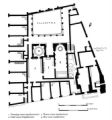
Forum (Pompeii), ground plan | | Image |
| 88 |
 |
Forum Baths (Pompeii), ground plan | | Image |
| 89 |
 |
Forum, ground plan | | Image |
| 90 |
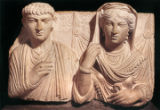 |
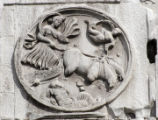
Funerary Relief of Yarkhai, son of Ogga, and his daughter, Balya | | Image |
| 91 |
 |
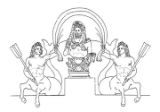
Gemma Augustea | | Image |
| 92 |
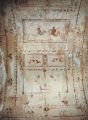 |
Golden House (Rome), barrel vault of a corridor, birds, animals, and marine creatures | | Image |
| 93 |
 |
Group of Commodus as Hercules and Two Tritons, reconstruction drawing | | Image |
| 94 |
 |
Hadrian | | Image |
| 95 |
 |
Head of a Julio-Claudian prince (probably Gaius / Caligula) | | Image |
| 96 |
 |
House (Pompeii) fresco, a Magistrate and his Wife | | Image |
| 97 |
 |
House (Pompeii) fresco, riot between Pompeians and Nucerians in amphitheater in CE 59 | | Image |
| 98 |
 |
House (Pompeii) fresco, woman holds a book and stylus | | Image |
| 99 |
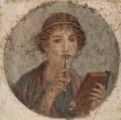
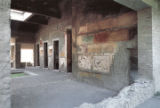 |
House of Sallust, interior view with wall paintings | | Image |
| 100 |
 |
House of Sirico, triclinium fresco: Healing of the Wounded Aeneas by lapyx | | Image |