|
|
Title | Creator | Creation Date |
| 901 |
 |
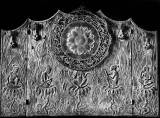
Shaka Triad, rubbing of Shaka's Mandorla | | 623 CE |
| 902 |
 |
Development of the Temple Plan in Japan | | |
| 903 |
 |
Shaka Triad, detail of Shaka's Mandorla showing relief Buddha figure | | 623 CE |
| 904 |
 |
Sokkul-am Cave Site Temple, Standing Bodhisattva | | mid 8th Century CE |
| 905 |
 |
Filigree Banner detail | | second half of 7th Century CE |
| 906 |
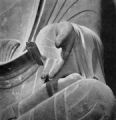 |
Shaka Buddha (detail of left hand in wish-granting mudra) | | 623 CE |
| 907 |
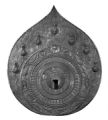 |
Yakushi Buddha, Mandorla | | second half of 7th Century CE |
| 908 |
 |
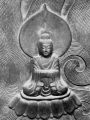
Shaka Triad | | 623 CE |
| 909 |
 |
Shaka Triad (detail of Shaka's head) | | 623 CE |
| 910 |
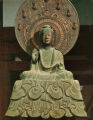 |
Yakushi Buddha | | second half of 7th Century CE |
| 911 |
 |
Shaka Triad (top) and Yakushi Buddha (bottom), detail showing skirt draperies | | 7th Century CE |
| 912 |
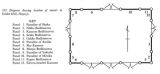 |
Horyuji Temple, Golden Hall, diagram showing location of murals | | 7th Century CE |
| 913 |
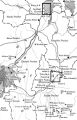 |
Map: Historical Sites in the Kyoto, Osaka, and Nara areas | | |
| 914 |
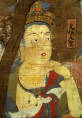 |
The Death of Shaka, detail | | 1086 CE |
| 915 |
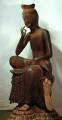 |
Miroku Bosatsu | | 7th Century CE |
| 916 |
 |
Tachibana Shrine (detail) | | 7th Century CE |
| 917 |
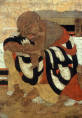 |
The Death of Shaka, detail of Disciple | | 1086 CE |
| 918 |
 |
Miroku Bosatsu (detail) | | late 7th Century CE |
| 919 |
 |
Baodingshan, Punishments depicted below the Tribunals | | 1179 - 1249 CE |
| 920 |
 |
Baodingshan, Punishments depicted below the Tribunals | | 1179 - 1249 CE |
| 921 |
 |
Baodingshan, Hell of the Blade Boat | | 1179 - 1249 CE |
| 922 |
 |
Baodingshan, Hell of Boiling Cauldron | | 1179 - 1249 CE |
| 923 |
 |
Baodingshan, Hell of the Iron Wheel | | 1179 - 1249 CE |
| 924 |
 |
Baodingshan, Hell of the Blade Boat | | 1179 - 1249 CE |
| 925 |
 |
Shakyamuni Smiling to Mahakashyapa, Mind to Mind Transmission of the Dharma | | 960 - 1279 CE |