Home
Browse
Ask Us
Chat
Harmful Language Statement
Log in
Art and Art History
Advanced Search
About
Curriculum-based images for use in teaching, research, and learning.
Type
Image
25
Format
image/jpeg
25
Collection
Art and Art History
25
Filters:
Style Period:
"Byzantine Art"
Subject:
"Architecture"
1
-
25
of
25
Gallery view
Number of results to display per page
10
25
50
100
200
Sort by Relevance
Sort by Title A-Z
Sort by Title Z-A
Sort by Date Ascending
Sort by Date Descending
Sort by Last Modified Ascending
Sort by Last Modified Descending
Title
Date
Type
1
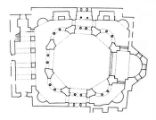
Church of Saints Sergius and Bacchus (Sergios and Bakkos), archeological plan
Image
2
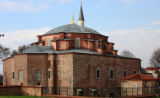
Church of Saints Sergius and Bacchus, exterior view
Image
3
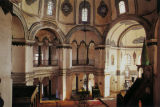
Church of Saints Sergius and Bacchus, interior view
Image
4
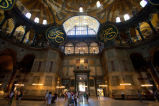
Hagia Sophia, central space
Image
5
Hagia Sophia, central space, aerial view
Image
6
Hagia Sophia, central space, foliage capital with emperor's monogram
Image
7
Hagia Sophia, central space, north screen wall
Image
8
Hagia Sophia, central space, north screen wall
Image
9
Hagia Sophia, central space, view from the west
Image
10
Hagia Sophia, drawing of the volumes at the east end, view from the southeast
Image
11
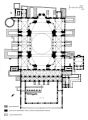
Hagia Sophia, groundplan
Image
12
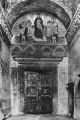
Hagia Sophia, interior southwest porch leading to the narthex, lunette mosaic
Image
13
Hagia Sophia, mosaic: Deesis (Christ flanked by Theotokos and John the Baptist)
Image
14
Hagia Sophia, northwest conch, view from the central space
Image
15
Hagia Sophia, probable arrangement of the principal liturgical furnishings and imperial metatorion at the time of the second dedication
Image
16
Hagia Sophia, reconstruction of the exterior as of 562 CE
Image
17
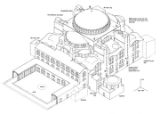
Hagia Sophia, restored cutaway view
Image
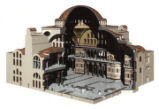
18
Hagia Sophia, view from the northwest
Image
19
Hagia Sophia, view from the west
Image
20
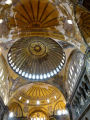
Hagia Sophia, view into the central dome flanked by semidomes
Image
21
Hagia Sophia, view into the dome over the central space
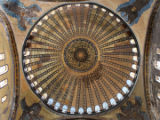
Image
22
Qal'at Si'man (Monastic Complex of Symeon Stylites), Martyrium, plan
Image
23
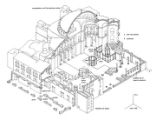
Qal'at Si'man, (Monastic Complex of Symeon Stylites), isometric reconstruction
Image
24
Saint Catherine Monastery, interior, apse, semidome mosaic
Image
25
Saint Catherine Monastery, site plan
Image
1
-
25
of
25